Hi all, just a quikee to go Yaaay! My Chaos giant is on Games Workshop's "What's New Today" feature.
Dead chuffed as some of the other work in display is superb!
That's all for now, normal service resumed next time.
TTFN

Wednesday, 29 June 2011
Monday, 27 June 2011
The Once and Future Captains...
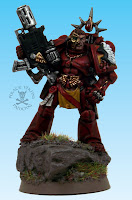
Yaay for enigmatic titles! This post sees the completion of all available commanders for the third company of the Blood Angels. First, an unfortunate fall in the form of the Death Company Captain Tycho - or "Psycho" Tycho as he will henceforth be known:

For those who aren't familiar with the backstory of this figure: Captain Tycho is one of the few "historical" special characters as he has been dead in the current storyline for a century or so. He was killed during the third war for Armageddon against his old hated foes, the Orks. During this conflict he finally succumbed to the rage and hate that had built up in his heart following his disfigurement at the hands of an Ork Weirdboy. Tycho fell to the Black Rage and with a heavy heart his company inducted him into the Death Company, there to find death by the blades of his enemies rather than the slow slide into homicidal madness. Once you are inducted into the Death Company, your brothers repaint your armour in funereal Black and daub red saltires indicating the wounds that Sanguinius suffered in his fatal duel with Warmaster Horus.
Whilst the armour was not too terribly exciting, see the chaplain entry for details on how to achieve the subtle black armour I wanted his face to be very different to the original paint job, here it is for comparison:

This paint job represents early middle age for Erasmus Tycho, his skin is still ruddy and his hair a rich red-brown. Compare this with his final hours:

I wanted him to look, old, ill, disturbed. Old was handled by using a fair amount of Fortress Grey in the final highlights on the skin and strategically in the hair to give him patchy greying hair. Ill was achieved by using very pale mixes of colour on the skin and sucking any livid colour from his flesh. Finally disturbed was indicated by his unkempt appearance (stubble) and the dark purple-black shading around the eyes. All in all it is a much different man in the second picture to the first. Even the gold was painted a more aged hue, less polished to indicate the passage of time. So with the great Captain Tycho dead who took over? A quick squint at the Codex indicates that the current Captain of the Third is Machiavi who has brought the nickname "Ironhelms" to the third companies honour roll. So who is this chap?

Well, the codex is silent on that question so we make up our own backstory! I came up with Machiavi being Tycho's first sergeant all the way through the Armageddon campaigns, a confidant and advisor. Upon Tycho's death a grief-stricken Machiavi assumed command of the Third as senior NCO. Refusing all rights of personal heraldry he stripped the paint from his helm and declared that the iron helm of a tactical Space Marine would be his only mark. Since then he has been known as Ironhelm and the nickname has stuck with his company. With this in mind painting was easy! The model is a limited edition Space Marine Veteran Sergeant that I think was released for the 25th anniversary celebrations but someone with a better memory can correct me. I have wanted an excuse to use this model for some little while and Machiavi gave me that opportunity.

I wanted the bare helm to be the focal point of the miniature so lavished some attention on it to gain the most convincing iron texture that I could. First came a base coat of Boltgun Metal. This was highlighted sparingly with Chainmail. Next came a thin wash of Vermin Brown mostly in the recesses. Once this was fully dry a very thin wash of Dark Flesh was also applied to the recesses. Astute long term readers will recognise this as a reversal of my usual method for painting rust. I wanted tarnished rather than corroded here. Once the Dark Flesh was dry a wash of Badab Black and then Devlan Mud helped to deepen the colours and provide the darkest shading. Finally I gave the helm a light drybrush of Boltgun to bring out the metallic colour once more. Do check out the picture in enlarged form. It is one of the few helmets that I am totally happy with having expanded to 1000 pixels tall!
So I now have the option to field the past, present and future of the Chapter depending on my whims (and whether special characters are being used):


It has been an interesting project to do this as not many characters have multiple paint schemes or indeed are dead! Hope you like them too. Now to decide whether Terminators, Sanguinary Priests, Land Speeders or those accursed Drop Pods get my attention next! Until next time,
TTFN

For those who aren't familiar with the backstory of this figure: Captain Tycho is one of the few "historical" special characters as he has been dead in the current storyline for a century or so. He was killed during the third war for Armageddon against his old hated foes, the Orks. During this conflict he finally succumbed to the rage and hate that had built up in his heart following his disfigurement at the hands of an Ork Weirdboy. Tycho fell to the Black Rage and with a heavy heart his company inducted him into the Death Company, there to find death by the blades of his enemies rather than the slow slide into homicidal madness. Once you are inducted into the Death Company, your brothers repaint your armour in funereal Black and daub red saltires indicating the wounds that Sanguinius suffered in his fatal duel with Warmaster Horus.
Whilst the armour was not too terribly exciting, see the chaplain entry for details on how to achieve the subtle black armour I wanted his face to be very different to the original paint job, here it is for comparison:

This paint job represents early middle age for Erasmus Tycho, his skin is still ruddy and his hair a rich red-brown. Compare this with his final hours:

I wanted him to look, old, ill, disturbed. Old was handled by using a fair amount of Fortress Grey in the final highlights on the skin and strategically in the hair to give him patchy greying hair. Ill was achieved by using very pale mixes of colour on the skin and sucking any livid colour from his flesh. Finally disturbed was indicated by his unkempt appearance (stubble) and the dark purple-black shading around the eyes. All in all it is a much different man in the second picture to the first. Even the gold was painted a more aged hue, less polished to indicate the passage of time. So with the great Captain Tycho dead who took over? A quick squint at the Codex indicates that the current Captain of the Third is Machiavi who has brought the nickname "Ironhelms" to the third companies honour roll. So who is this chap?

Well, the codex is silent on that question so we make up our own backstory! I came up with Machiavi being Tycho's first sergeant all the way through the Armageddon campaigns, a confidant and advisor. Upon Tycho's death a grief-stricken Machiavi assumed command of the Third as senior NCO. Refusing all rights of personal heraldry he stripped the paint from his helm and declared that the iron helm of a tactical Space Marine would be his only mark. Since then he has been known as Ironhelm and the nickname has stuck with his company. With this in mind painting was easy! The model is a limited edition Space Marine Veteran Sergeant that I think was released for the 25th anniversary celebrations but someone with a better memory can correct me. I have wanted an excuse to use this model for some little while and Machiavi gave me that opportunity.

I wanted the bare helm to be the focal point of the miniature so lavished some attention on it to gain the most convincing iron texture that I could. First came a base coat of Boltgun Metal. This was highlighted sparingly with Chainmail. Next came a thin wash of Vermin Brown mostly in the recesses. Once this was fully dry a very thin wash of Dark Flesh was also applied to the recesses. Astute long term readers will recognise this as a reversal of my usual method for painting rust. I wanted tarnished rather than corroded here. Once the Dark Flesh was dry a wash of Badab Black and then Devlan Mud helped to deepen the colours and provide the darkest shading. Finally I gave the helm a light drybrush of Boltgun to bring out the metallic colour once more. Do check out the picture in enlarged form. It is one of the few helmets that I am totally happy with having expanded to 1000 pixels tall!
So I now have the option to field the past, present and future of the Chapter depending on my whims (and whether special characters are being used):

It has been an interesting project to do this as not many characters have multiple paint schemes or indeed are dead! Hope you like them too. Now to decide whether Terminators, Sanguinary Priests, Land Speeders or those accursed Drop Pods get my attention next! Until next time,
TTFN
Saturday, 25 June 2011
Blood Angels Chaplain and the last tactical squad...
Greetings all, we are getting very close now. Just thirteen models stand between me and 4000 points of lunatic Blood Angel goodness. Here are the latest offerings, first the 3rd Company Chaplain:

For anyone considering buying a chaplain, get this guy. He is just a lovely sculpt, the skull especially and I suspect that it will look even better in Finecast! The black armour is the part that challenges most people and I am going to let you all in on a Pirate Viking painting secret. Drybrushing is your friend. Seriously. It doesn't always work, especially on Space marine armour, but for black it is tough to beat. This gentleman had multiple carefully drybrushes layers (and real drybrushing, the brush cannot be damp at all) using a large drybrush that is normally used for tanks. The layers went something like: Adeptus Battlegrey and Chaos Black; Adeptus Battlegrey; Adeptus Battlegrey and Codex Grey; Codex Grey. Each layer is progressively lighter than the last. Once you are finished he will look like he is made of concrete. Trust the Pirate Viking and continue to the next stage. Paint in all the metalwork with chainmail. Wait for that to dry (about a cup of tea duration, conveniant huh?) and then hit him with two coats of Badab Black, waiting for the first to dry before applying the second. This looks so effective that I am actively considering a black Space Marine army (Black Templars perhaps) as a side project because the effect is so very, very fast to complete.

The bone is Khemri Brown, shaded down with Devlan Mud and then highlighted through many thin layers of Khemri Brown mixed with increasing amounts of Bleached Bone until pure Bleached Bone is reached. A few final highlights of Bone and White finished the effect. The last step is a very, very thin glaze of bone and white highlight mix with a thin layer of satin varnish over the top to give a polished finish.

Continuing a theme, here are some more Blood Angels! Surprised huh? This is the 3rd companies 4th Tactical Squad and the last that I will be painting for this project. These gents are designed to drop pod down into the heart of the enemy in support of the two dreadnoughts and capture enemy held objectives. Hence they are armed with short range but lethal melta weaponry.

Having finally run out of Sanguinary Guard swords to use on Sergeants I needed an alternative power sword. Something of a similar length to the other blades but fancy enough to be a Blood Angels weapon. Enter an Empire Wizard's sword from the fantasy range, combining this with the grip and pommel from the Command Squad relic blade was child's play and generated the right effect. And while we are talking conversion:

Given that these guys are the closest thing to an assaulting Tactical Squad that you are going to get I wanted a marine throwing a grenade among their number. By tilting the torso to the side I gave him the impression he was leaning into the throw. The left arm needed a bit of chopping and repositioning to hold the boltgun in a believable way but I think the overall effect was worth it.
Well, that's all folks for today, as mentioned earlier, only 13 models remain unfinished and five of them are half done. The planner below shows what is still to do. All manner of exciting!
TTFN

Tuesday, 21 June 2011
Warcaster Alaistair Caine
It's all go around here isn't it? Last night I sat down to start my Warcaster (the Captain version of Alaistair Caine) and found to my astonishment 4 1/2 hours later that he was finished. He is a lovely model to paint and so there was nothing else to do but share him with the world. So here he is!

I was partially using the good Captain to figure out the colour scheme that will be applied to all of the infantrymen in the Cygnar army. I am loving the steampunk world war I vibe that most of the Cygnar infantry have and so decided to embrace it. Thus his clothing (zoom in on the chest and neckerchief for the easiest view!) was painted in the classic British khaki drab that was used throughout both world wars. The specific colour is Vallejo English Uniform shaded with a thinned Devlan Mud Wash and highlighted with increasing mixes of English Uniform and Kommando Khaki. I knew that the armour plates would be chipped blue and the coat would be brown leather so this left me with a head scratcher for the coat lining. I didn't want to use the English Uniform again as this would cause the coat to blur with the clothing. I also did not want to use a dark blue as that would look too opulent and spoil the soldier look he had going. In the end I chose a neutral grey to avoid adding another hue to the pallete. Trouble was, there was a LOT of coat lining and the grey made it look boring. To kill this problem I added some freehand decoration to the lining in a lighter grey.

Phase two was the coat leather. I wanted it to look well cared for but a little battered. To get that dark brown leather shade I first basecoated the coat in Scorched Brown, a wash of Badab Black gave me the deep shadows. Highlights were built up back from Scorched Brown through mixes of Scorched Brown and Vomit Brown to A Scorched/Vomit Brown mix with Kommando Khaki added for the worn edges. I'm dead chuffed with the finish of the leather so this is going to be "Cygnar Leather" for the army! The blue metal componants were next following my usual Cygnar Blue of a Necron Abyss basecoat followed by Regal Blue, Regal plus Enchanted Blue mixes, Enchanted Blue and an Enchanted Blue and Space Wolves Grey edge highlight. The whole thing washed down with Asurman Blue to give a rich dark blue.

The base is a lovely modelled stone-effect piece included with the kit. I painted it in fairly muted shades (Charadon Granite highlighted with increasing mixes of Charadon and Fortress Grey and with a Badab Black and Devlan Mud mixed wash to bind all the layers together. I toyed with adding worn paint to the Cygnar swan and background but decided that it would start to overwhelm the model if I did that and prevent it from fitting in with the Thornwood theme I had going. Instead I added some overgrowing ivy and blown dead leaves to the piece to give it that "ruin in the Thornwood" feel. I have since stuck him with the two warjacks and the bases match nicely.

I decided to push myself with the face. Annoyingly the camera hasn't captured the face as crisply as I would have liked but I hope you can get an impression of what I have done. Yes, he does have blue eyes. I may have lost my mind. Sadly, until I can scrape together the cash for the Trencher box set that is it for Warmachine for now. Just time to remind everyone that we are on Facebook and Twitter and have a Flickr account too, you can find them all on the right of this post. Plus we are available for hire! Check out the "Hire" page on the top right, I guarantee we are more affordable than you might think! Till next time.
TTFN
Monday, 20 June 2011
A Thunderbolt from a clear sky
There are some units and models that you promise yourself that you will keep as a treat for finishing other projects. Well, this is one of those units, my Blood Angels Vanguard Veterans:
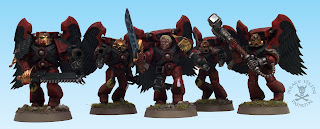
Pretty aren't they? As I have mentioned before I love the sanguinary guard models but had no intention of using the unit. So I initially kitbashed the models into my death company, my command squad and now my Vanguard Veterans too. Essentially I mated the backplate of the Sanguinary Guard (that the wings attach to) to the front plate of an assault marine, it isn't a perfect match, a little trimming is necessary to get the arms to sit neatly and a purist would sculpt the rubber pack straps going over the shoulders and into the wings. To be honest you just can't see them unless you are really looking for it so I simply didn't bother. Life's too short right?

With the painting I decided on a deliberately "normal" scheme. White wings would have stood out from the army too much and I did not want to give the mistaken impression that these models were Sanguinary Guard. Plus the black pinions echo the chapter badge and so worked rather nicely for me! Some of the models lacked a moulded blood drop on the shoulder pad to be painted white (3rd Company marking) so they got a kneepad drop instead. The Assault marking is indicating them to be the other half of the 8th squad. In essence I feel that vanguard and sternguard units can be used to represent experianced members of squads that have fought together for centuries rather than just members of the first company. This is what I have done in this army to keep it a pure 3rd company force.

Something that has struck me lately is how much my painting has evolved in the last year. Take a look at the writing on the scroll on the shoulder pad and the lightning on the sword. Now take a look at some of the first Blood Angels I painted way back at the start of this blog. Something of a difference eh? I am actually proud of the results I've achieved above. Although I have a long way to go and always something new to learn before I am at the levels of my painting heroes. So here we are and as the picture below shows, only 24 models to paint before Project Blood Angels is finished. Whoa! Until next time folks:
TTFN

Saturday, 18 June 2011
Servants of the Machine God
Today I present one of the most awesome and under used models in the Space Marine army, the Techmarine:

He is a properly busy model, kind of a cross between Dr Octopus and Iron Man. Before I get into how I painted this fine fellow I thought I would sing his praises in game for a moment as no-one seems to use him. Yes, he isn't a death machine like a chaplain or librarian but he is as tough as any other marine and has more armour to boot. Don't use him with servitors as it is a bit of a waste of his talents. Instead use him as an addition to a squad, with the full servo-harness shown above this will add two power fist attacks, a flamer and a twin-linked plasma pistol to the squad (normally in the order of 65 points and the plasma pistol isn't twin linked). He can bring another power weapon to the party so his 2 attacks on the charge bypass armour anyhow and can eliminate threats to him before he swings his power fists. Add to this the ability to fix the transport the unit is in by disembarking, fixing the vehicle while the unit shoots at something and then hopping back in next turn and driving on. Finally he has his piece de resistance: the ability to increase the cover value of one piece of terrain for the entire game just by being on the table. Just try digging a devastator squad out of a ruin that effectively makes their save invulnerable. But enough of this, how was he painted?

First thing first, solving a problem that I believe stops lots of people using this model. It is flippin' huge and sticks out all over the place, transporting it is a nightmare. It is also a pain in the bum to glue together (I cannot wait for a Finecast version of this [EDIT: Turns out that there is a finecast version but you can only get it in the box set with the servitors]). I solved both of these problems by ignoring them, with the use of magnets! By attaching the arms with tiny neodeum magnets I solve the transport problem and the issue of the arms breaking off every time there is a strong breeze. The only problem was the two lower arms. Magnets, you see, are excellent at resisting pulling or shearing forces but rubbish at stopping torsion (twisting) forces. The heavy arms needed some additional support to stop them hanging slackly down. To this end I attached a length of wire stiffened with superglue that formed a cradle to hold the arms. By painting this as cables I disguised it as best I could. Can't wait for a resin version that will not have that problem. Also based him on the larger 40mm terminator base as he is a huge imposing model and looks ridiculous on the normal sized base.

Techmarines are traditionally red but so are all my Blood Angels. I didn't want his specialism colour to vanish amidst the rest of the army so I thought I would try out From the Warp's Flesh Tearer red. This would give me a different red without just painting another Blood Angel. I won't steal his thunder, follow the link and see how to paint this version of red. Go on, I'll wait....

In order to bind him to the rest of the army I painted the interior of the shoulder pads and the kneepad in the usual Blood Angel scheme and added the company mark to the kneepad and a transfer to the shoulder for the iconography. I haven't covered transfers on Space Marines much (all my Blood Angels have moulded shoulder pads unless I cannot help it) but getting them to sit flat is a pain in the bum. To fix this I recommend - so long as you are an adult - getting your hands on a set of Micro Set and Micro Sol. I will do a full tutorial on how to use these in the near future but they really make them look painted on. I had to do some surgery on the transfer to get it to fit but worth it in the end.

The odd thing about this figure was that he just was not looking right all through the paint job. I had made him very clean with well cared for wargear and the like as he was a techmarine after all. Trouble was, it didn't look "right", something was missing. So I sat and stared at it for a while and gradually came to the realisation that this guy isn't a warrior, he is a human JCB, a piece of construction equipment. While I am sure that his servitors will patch up everything beautifully after the campaign, during the campaign he is flaming busy! These guys are rare and their job is hard core. With this in mind I attacked the model as though it was a tank, chips, dings, scratches, grease and oil and even a dust wash into the gaps. Suddenly he looked right. Job done.
Next time will probably be the Vanguard Veterans that I have been working on to stave off the crushing tedium of the Drop Pods. There are some models that just seem to take FOREVER to paint and Drop Pods are one of them, I am painting 3 simultaneously to get them out of the way. Go figure. Anyway, till next time
TTFN

He is a properly busy model, kind of a cross between Dr Octopus and Iron Man. Before I get into how I painted this fine fellow I thought I would sing his praises in game for a moment as no-one seems to use him. Yes, he isn't a death machine like a chaplain or librarian but he is as tough as any other marine and has more armour to boot. Don't use him with servitors as it is a bit of a waste of his talents. Instead use him as an addition to a squad, with the full servo-harness shown above this will add two power fist attacks, a flamer and a twin-linked plasma pistol to the squad (normally in the order of 65 points and the plasma pistol isn't twin linked). He can bring another power weapon to the party so his 2 attacks on the charge bypass armour anyhow and can eliminate threats to him before he swings his power fists. Add to this the ability to fix the transport the unit is in by disembarking, fixing the vehicle while the unit shoots at something and then hopping back in next turn and driving on. Finally he has his piece de resistance: the ability to increase the cover value of one piece of terrain for the entire game just by being on the table. Just try digging a devastator squad out of a ruin that effectively makes their save invulnerable. But enough of this, how was he painted?

First thing first, solving a problem that I believe stops lots of people using this model. It is flippin' huge and sticks out all over the place, transporting it is a nightmare. It is also a pain in the bum to glue together (

Techmarines are traditionally red but so are all my Blood Angels. I didn't want his specialism colour to vanish amidst the rest of the army so I thought I would try out From the Warp's Flesh Tearer red. This would give me a different red without just painting another Blood Angel. I won't steal his thunder, follow the link and see how to paint this version of red. Go on, I'll wait....

In order to bind him to the rest of the army I painted the interior of the shoulder pads and the kneepad in the usual Blood Angel scheme and added the company mark to the kneepad and a transfer to the shoulder for the iconography. I haven't covered transfers on Space Marines much (all my Blood Angels have moulded shoulder pads unless I cannot help it) but getting them to sit flat is a pain in the bum. To fix this I recommend - so long as you are an adult - getting your hands on a set of Micro Set and Micro Sol. I will do a full tutorial on how to use these in the near future but they really make them look painted on. I had to do some surgery on the transfer to get it to fit but worth it in the end.

The odd thing about this figure was that he just was not looking right all through the paint job. I had made him very clean with well cared for wargear and the like as he was a techmarine after all. Trouble was, it didn't look "right", something was missing. So I sat and stared at it for a while and gradually came to the realisation that this guy isn't a warrior, he is a human JCB, a piece of construction equipment. While I am sure that his servitors will patch up everything beautifully after the campaign, during the campaign he is flaming busy! These guys are rare and their job is hard core. With this in mind I attacked the model as though it was a tank, chips, dings, scratches, grease and oil and even a dust wash into the gaps. Suddenly he looked right. Job done.
Next time will probably be the Vanguard Veterans that I have been working on to stave off the crushing tedium of the Drop Pods. There are some models that just seem to take FOREVER to paint and Drop Pods are one of them, I am painting 3 simultaneously to get them out of the way. Go figure. Anyway, till next time
TTFN
Wednesday, 15 June 2011
Leicester Tigers Commission
Or "And now for something completely different!"
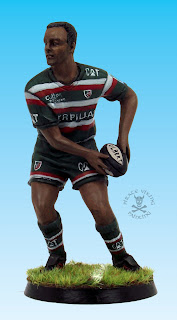
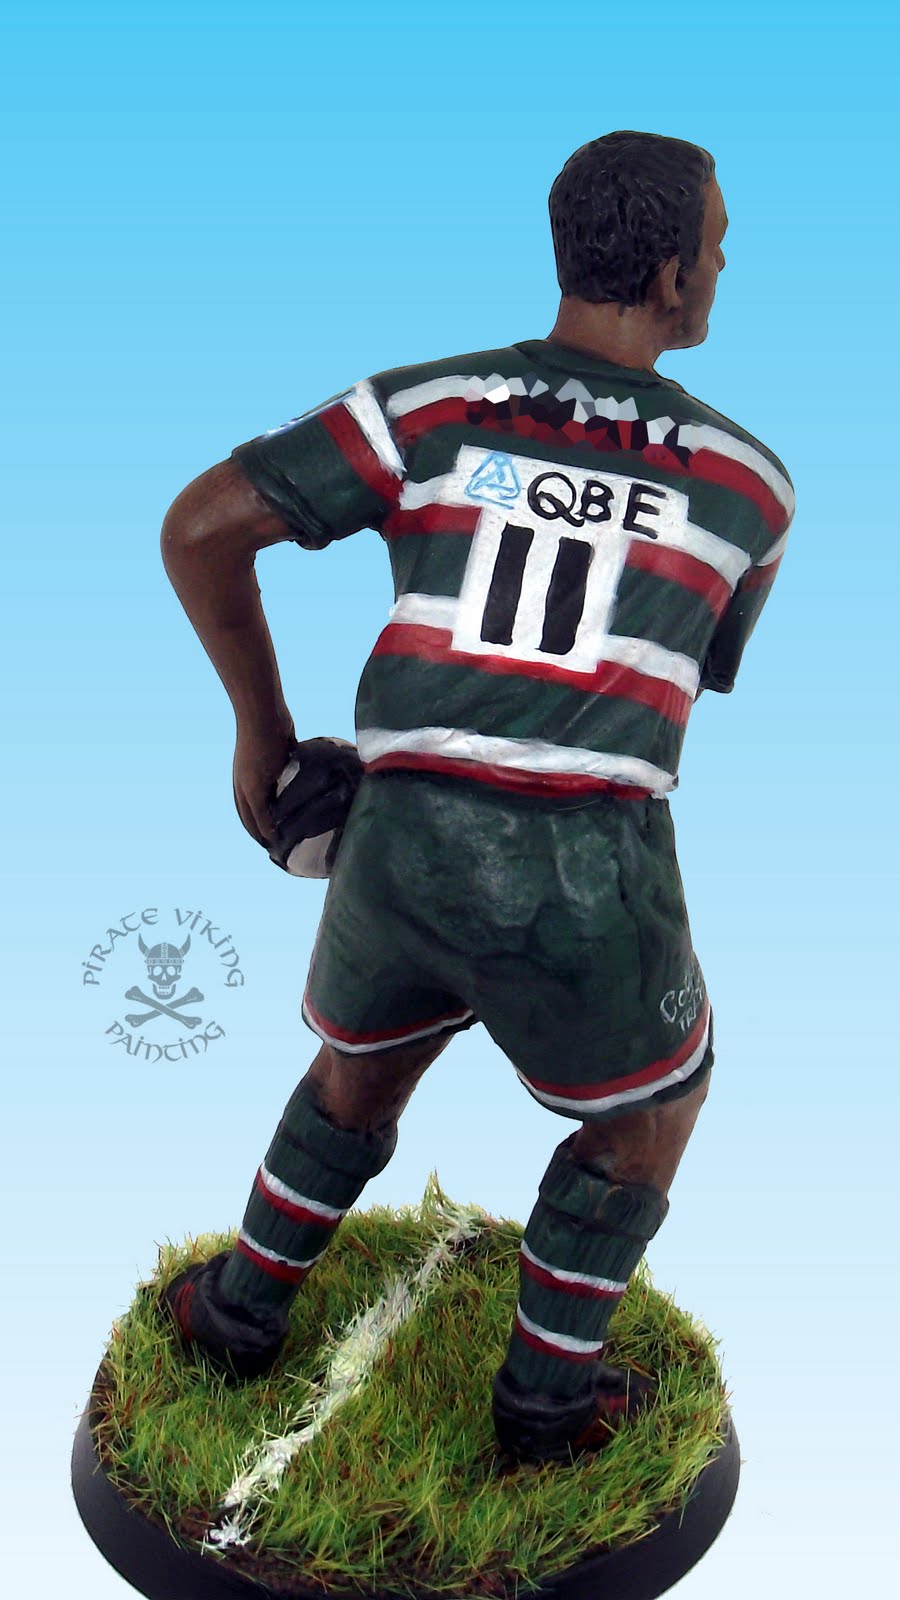
I take any and all sorts of commissions, I've even painted military insignia on a wobble-headed Darth Vader so I am no stranger to non wargaming painting. This rugby player was for a friend of my client as a going away present. He is a rugby fanatic and a long time follower of Leicester Tigers. The first challenge was finding a suitable model. This is where problems began, just try searching for suitable sports miniatures. Hard isn't it? In the end I hit upon trophies as a possible source of the model. Lots of sports trophies have a representation of the player on them and with a little searching I found this fellow:

"Perfect," thought I, "fairly nice sculpting and probably a fair size". I ordered one and started researching the Leicester kit. Then the trophy arrived and looked great:

Until I turned it around:

Darn, it's one of those designed to sit flat against the wall. Of all the bad luck. No word of this on the web site where I bought it of course but hey ho. Time to fix the problem rather than grumbling about it. First, remove it from the base so it can be worked.

A razor saw is an invaluable tool for this kind of work. The wide, thin blade is held rigid by the folded metal spine and the tiny teeth allow lots of smooth cutting action with minimal pressure applied. Once removed I could identify the areas of the resin that needed to be shaved away from the model.

Carving away the resin and texturing it to match the sculpting of the socks was a fairly straightforward matter of carving with a scalpel and thin needle file. Once this was completed I needed to sculpt the flattened areas of the model to be properly three dimensional.

The flattened areas were scored with the razor saw to help the green stuff key to the model. The main bulk of the buttocks and heel were roughed out and left to dry. I carved the green stuff smooth and then added the detail of the folds etc. Finally, the model was ready for painting, he was huge too so lots of room for detail. To show how large, enter Ms Funnymoney:

Painting started with the Tigers strip, through a good deal of google searching I had got about twenty reference shots of the relevant kit.
The stripes of the kit were the first challenge, I roughed them out with strips of masking tape to help keep them parallel and then tidied them by eye later.

[The pixallated area is to protect the privacy of the client whose name is underneath] I had a photograph of the person the model was for and spent some time matching his skin tone using custom mixes of some very odd paint tones. I will use this moment to ask an open question to all manufacturers of miniature paint: WHY IS YOUR ONLY FLESH TONE CAUCASIAN!? That is all.

Oddly enough, it is not really the colours of the strip that make it recognisable as genuine sports kit but the logos of the sponsors. I can honestly say that the CAT logo gets kinda boring after a while! Worth it though as the little details like the Heineken Cup patch and all the other logos give him that authentic feel. The close up of the face shows all the extra subtle detail that you can put into a model at this scale. Stubble, eyebrows, irises, twelve or so blended layers for the highlights. Lots of fun to produce the result.
It is nice to finally publish this as it has been a while since I finished him! I always sit on present commissions until I have confirmation that the intended recipient has got their surprise in! Hope he likes it. Until next time:
TTFN

I take any and all sorts of commissions, I've even painted military insignia on a wobble-headed Darth Vader so I am no stranger to non wargaming painting. This rugby player was for a friend of my client as a going away present. He is a rugby fanatic and a long time follower of Leicester Tigers. The first challenge was finding a suitable model. This is where problems began, just try searching for suitable sports miniatures. Hard isn't it? In the end I hit upon trophies as a possible source of the model. Lots of sports trophies have a representation of the player on them and with a little searching I found this fellow:

"Perfect," thought I, "fairly nice sculpting and probably a fair size". I ordered one and started researching the Leicester kit. Then the trophy arrived and looked great:

Until I turned it around:

Darn, it's one of those designed to sit flat against the wall. Of all the bad luck. No word of this on the web site where I bought it of course but hey ho. Time to fix the problem rather than grumbling about it. First, remove it from the base so it can be worked.

A razor saw is an invaluable tool for this kind of work. The wide, thin blade is held rigid by the folded metal spine and the tiny teeth allow lots of smooth cutting action with minimal pressure applied. Once removed I could identify the areas of the resin that needed to be shaved away from the model.

Carving away the resin and texturing it to match the sculpting of the socks was a fairly straightforward matter of carving with a scalpel and thin needle file. Once this was completed I needed to sculpt the flattened areas of the model to be properly three dimensional.

The flattened areas were scored with the razor saw to help the green stuff key to the model. The main bulk of the buttocks and heel were roughed out and left to dry. I carved the green stuff smooth and then added the detail of the folds etc. Finally, the model was ready for painting, he was huge too so lots of room for detail. To show how large, enter Ms Funnymoney:

Painting started with the Tigers strip, through a good deal of google searching I had got about twenty reference shots of the relevant kit.
The stripes of the kit were the first challenge, I roughed them out with strips of masking tape to help keep them parallel and then tidied them by eye later.
[The pixallated area is to protect the privacy of the client whose name is underneath] I had a photograph of the person the model was for and spent some time matching his skin tone using custom mixes of some very odd paint tones. I will use this moment to ask an open question to all manufacturers of miniature paint: WHY IS YOUR ONLY FLESH TONE CAUCASIAN!? That is all.

Oddly enough, it is not really the colours of the strip that make it recognisable as genuine sports kit but the logos of the sponsors. I can honestly say that the CAT logo gets kinda boring after a while! Worth it though as the little details like the Heineken Cup patch and all the other logos give him that authentic feel. The close up of the face shows all the extra subtle detail that you can put into a model at this scale. Stubble, eyebrows, irises, twelve or so blended layers for the highlights. Lots of fun to produce the result.
It is nice to finally publish this as it has been a while since I finished him! I always sit on present commissions until I have confirmation that the intended recipient has got their surprise in! Hope he likes it. Until next time:
TTFN
Monday, 13 June 2011
Cygnar marches on!
Bet you thought I'd forgotten about Warmachine huh? Been a while since I posted the Cyclone but here is the next member of the Cygnar force, a Grenadier Light Warjack:

Grenadier 'jacks are designed to work alongside Trencher infantry in the field. They provide fire support and help with entrenchments and fortifications. They are a very compact design in comparison to the heavier warjacks and consequently a little smaller as well:

Painting the Grenadier proceeded in an identical manner to the Cyclone so I shall leave you to get the basic information from the older post and will focus on areas of interest within this model.

I have kept the furnace glow thing for the face and the Cygnarite runes denoting it's class on the pauldrons. The gun looked to be a mini steam generating cannon and so I painted in a steam gauge and made sure that there was light rusting around any area where steam would escape. I initially painted the hose in a rubbery colour before checking myself and remembering that rubber was a fairly late invention and oiled leather was used in the early Victorian period that the very steampunk Warmachine seems to emulate. I therefore repainted the section in my usual leather tone of Dark Flesh with a Devlan Mud wash.

The back of the model is just lovely, the little pouches emphasise the connection that the 'jack has with the men that work with it (Trenchers can reload the Grenadier's cannon for faster firing). The barrel has no texture applied to it and I suspect it was intended to be metal. The design of the ends though screamed wood to me and so I applied wood grain to the barrel. Took a while but looks quite charming. Verdigrised copper piping and oily joints finished off the figure and it was time to get to the basing.

Time for a little plug here I think. The bases for both the warjacks were finished off with leaf litter from Antenociti's Workshop. This store is a treasure trove of wonderful products and I own a bunch of them. The poison ivy tufts that also adorn the bases come from here too but you can get them from Army Painter. The logs were sticks picked up from around the woods in Candlestone, South Wales. I was camping there and noticed that a lot of the thinner sticks branched and broke in scale to represent logs. Half an hour of busy collecting later I had a tupperware box full of scale logs. Then I saw Woodland Scenics selling boxes with a tenth of the amount I had gathered as "deadfall" for £4! How I laughed...

I also went back and "leafed" the base of the cyclone too. This sort of attention to the bases takes quite some time and I would baulk at doing it for a Warhammer army. A Warmachine force though is generally smaller than most of my Warhammer units so a little more effort is justified I think. Next on the workbench for Warmachine is Captain Alaistair Caine. He'll be the first "normal" person I paint from the Iron Kingdoms, it's all been steam driven robots till now. Sadly he has to wait for a bit because with only 29 models to paint for my Blood Angels to hit 4000 points and the end of that project for good I am focused on them. Till next time
TTFN
Saturday, 11 June 2011
Ancients of Baal!
Greetings all, and for your delification and delight I present the most ancient of heroes the Blood Angels have to offer, their dreadnoughts:

For those who aren't in the know: Dreadnoughts are a form of walking tank that contains a life-support sarcophagus to keep alive a greviously wounded Space Marine hero to continue to fight for the chapter. They are functionally immortal as long as battle does not claim them and many represent the memory of their chapter's history and legends. Oh, and Ms. Funnymoney is about to demonstrate, they are big!

The larger of the pair is Abraxus, the Furioso Dreadnought:

With a frag cannon strapped to his left arm and that fist of doom on the left he will be a nasty prospect for anyone to face, particularly as he will be dropping out of the sky in his very own drop pod. Painting for these fellows started with a nice heavy metal basecoat starting from Tin Bitz and working all the way up through Boltgun Metal and Chainmail to Mithril Silver on the hard edges. Then the usual Blood Angels red basecoat (see Book of Jeff) and highlights drybrushed on.

I gave the frag cannons shell belt a rubberised feel as the metal that I had painted it in just wasn't doing it for me. Looked too inflexible, there aren't any joins in the belt to indicate chain feeds or anything. I figured rubber would distend neatly to spit out the shell casings and would grip the coke can sized bullets nicely. My usual mix of Charadon Granite with a couple of layers of Badab Black sorted out the effect pleasantly.

I decided to really scratch and ding up the paintwork on the fists of both dreadnoughts as, lets face it, they are huge lumps of metal designed to punch other lumps of metal. The effect is simple to achieve. Just get a bit of sponge, load it up with the top highlight colour of the paint you are using and then stipple and drag chips and dings randomly around the area. Then paint in the largest chips and scratches with a 1:1:1 mix of Chaos Black, Scorched Brown and Boltgun Metal. Creates a lovely effect. I go into lots more detail on this technique here.

Smaller, but still huge, is Helios a standard Blood Angels Dreadnought. This chap is the dread that is contained in the Assault on Black Reach kit. I chose him primarily for his weaponry, multi-melta plus drop pod = lots of sad tanks.

Speaking of the multi-melta, I am really happy with how the burnt nozzle effect came out on this kit. To replicate this effect you start with a fairly liberal drybrush of Bestial Brown, avoid having the drybrush end in a regular stripe around the gun. Next drybrush Scorched Brown around the same area taking care to fade out the colour to leave some Bestial Brown showing. Finally Chaos Black is drybrushed around the nozzles themselves. Quick, simple, effective. My favourite type of painting!

To make the generic dreadnought a bit more Blood Angel-ey I nicked a shoulder pad wing from the death company box, filed it flat and glued it on. Little details like that can help to lift a model and make it fit with the army better.

So that brings us ever closer to the end of project Blood Angels. Though the planner above is for a 3k arny I am just 30 models away from hitting 4000 points and that is where the project will stop, end, finito, no more. The next image shows the 4k plan:

It is designed to represent the moment that Tycho turned at Armageddon and was replaced by Machiavi. With the options in the 4k list I can create pretty much any Blood Angels army I please and can replace Tycho with Machiavi if anyone is grumpy about special characters. I think I'll have a drop pod session next, get that big job out of the way! Till then:
TTFN
Subscribe to:
Posts (Atom)