Wednesday 31 July 2013

Death Korps armour crew

Hi folks! We've mostly got half measures today:


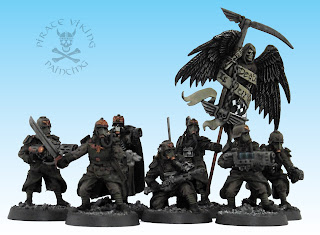
Yup, "top half only" to misquote Brassed Off. The models above are for the turrets of tanks sticking out of the cupola so there's no need for legs. This half of the commission was for tanks with a "Third Reich"-esque camo scheme so the client wanted a Panzer-feel tank uniform. Instead of pure black I went with grey with gloss black armour plates. Pure black is very much the colour of commissars in the Imperial Guard. The pinkish red piping on the cuffs and epaulettes is actually authentic colour for german tank crews back in the '40's. Pink being a girls colour is a fairly recent development - heck napoleonic Russia had whole regiments with pink and green banners - we'd initially dismissed the pink as it might have seemed silly. But during painting the crews needed a little something else and so the pink was lurking in the back of my mind. Tried it, and who knew? It works.


Then as an example of how much a different paint job changes a model we have the DKK infantry scheme on the same figures. These guys are destined for chimeras. I used the grenadier scheme to add the green ballistic plates to the steel helmets. Figured if your job includes sticking your head out of armoured vehicles you'd want the extra protection.

Just add a girder and a New York skyline right?
Finally today we have the centaur crews. These chaps are actually destined for Salamander troop compartments. As a result the "driver" models needed some converting:


I had a spare DKK lasgun and grenade launcher and was able to get reasonably convincing "at ease" poses with their weapons across their laps. But what to do with the third. I tried having him sitting there just weaponless but the fist in the air just looked weird. I sat there looking at it and trying to figure out what to do with him. Then the idea struck me. A brew. A section of plastic tube closed off at one end and smoothed off with a thin strip of plasticard for a handle and the classic squaddy enamel mug is formed. Add some chips and dings and he's all there. There is one important question about the model though and I wonder if anyone will ask it in the comments? ;) That's all for models today but I thought I would finish with a wargamer fitness report:


Nope, hadn't forgotten about this! Weight loss progress has slowed a little, but I've still lost another 6 pounds or so putting me down to 19st 7lb. More importantly, my fitness is increasing exponentially. I've been doing the NHS's couch to 5k program of running podcasts. They're designed to take you from sedentary to running 5k without rest. Over the past two months or so I've gone from being barely capable of jogging for a minute at a time to running 8 minutes - over a kilometer - at a time. (The program is interval training so the current run is two eight minute runs seperated by a recovery walk). I honestly feel better than I have in years and haven't been this weight since university 13 years ago. I'll keep you posted on progress and there'll be a before and after pic in the fullness of time (probably at the end of the year).

TTFN

Thursday 25 July 2013

Death Korps again and nifty banners!

Greetings shipmates! I have more shinys for you, this time Death Korps flavour:


Long time readers will know this as an expansion of the previous Death Korps army I painted for the same client. This time around it is a mish mash of tank commanders, orphaned sergeants and other random "fill in" bits. Including the rather nifty command squad pictured above. One feature does rather leap out though right?


The client wanted the Empire army standard part used as it was so perfect for this rather grim army. I thought we could go a bit further though and made some modifications. The sigmar symbol on the shield was ground and sanded off, the hammer head removed and replaced with a Zombie scythe. I then removed the back of the scythe head, cut an aquilla in half, glued the halves together and attached them to theme the scythe. A flagellent's chain and a tank skull-quilla finished the effect. These small changes made the icon much, much more Imperial in tone rather than Empire. The "Death is Our Gift" legend is totally a Buffy the Vampire Slayer paraphrased quote btw.


The host of add-ons finish off this post, I've discussed the painting before on this blog but it is worth noting something about this batch. Despite the best efforts of the camera - khaki shades are evil to photograph - this batch is much more vibrant than the last. This is due to the change in paint shades. Citadel have done me a favour here. The militaristic colours from the Foundation range that I loved are still here, but a bit more saturated. Creates a much nicer effect. The models are much nicer in the "flesh" too, stupid camera ;)

TTFN

Thursday 18 July 2013

Triari Sinister Walks!

Another Legio Astorum Warhound Titan marches out of the forge fires of the Pirate Viking Painting mechanicus workshops:


This one is Triari Sinister, the third Legio Astorum commission I've completed. Kinda feel like I'm building the whole Titan Legion one by one ;) . Lets check out some glamour shots:


Unlike the previous titans, this was mostly blocked in with an airbrush, made getting a nice solid, smooth blue a breeze. The yellow is Minitaire "Craven" over white with shading provided by Casadora Yellow.


I like this configuration of Warhound, Vulcan Mega-Bolter to strip shields and a Turbo-laser Destructor to provide the killing blow to enemy engines. Works just as well on smaller things too! I'm getting the hang of the "energised plasma" look on the TLD's too. Essentially you mist on white over a black undercoat with an airbrush. Add lightning in white and then once nice and dry, glaze with a couple of heavy coats of green ink through the airbrush. Finish with varnish or water effects to create the armoured glass containment vessels.


The heraldry was once again drawn from the pages of Imperial Armour. Freehand flames for the forward carapace and airbrushed white discs as the foundation for the legio "black star" markings. You then add the radial lines of the starburst freehand in white - make sure you go for anything other than 8 points or it looks like secret chaos affiliation, mine are 12 - and then paint the black disc in to finish it off. If you look, I've added the mechanicus discs that come in the kit to the shoulder mounts. This is going to sound crazy, but... despite the fact that the three titan's I've painted are for two different clients, I wanted minor structural differences between the three.


I love the effect of the engine deck beneath the grill. Gives a nice realistic air to the model. Looks ace.

So now to crate this bad boy up and deliver him unto the waiting hold of the good starship Royal Mail. The lower incidence of content on the blog lately has been mostly because of the time huge figures take to complete so hopefully there should be a resurgance of nifty models on the blog soon!

TTFN

Saturday 6 July 2013

Modernising Leman Russ Tanks

Greetings all, been a while since the last post hasn't it? Oops. This was for two reasons, the first: I'm painting a whacking great titan that takes ages to finish and be photographed. The second: I had a mojo crash and took a few days off last week (you have to remember that you are allowed these things when you're self employed). Of course, this being me I couldn't do nothing miniature related so I spent some time with tanks making this happen:

(c) Games Workshop, used for illustrative purposes

What is the difference between the two pictures? About twenty years. Seriously, the photo on the left? 1994. The right, the modern russ from a few years ago. There is an astonishing lack of difference between the two. It is a kit that has really stood the test of time. Why do I care? Well, with re-release of Apocalypse reminded me that I still had an Emperor's Fist tank company sitting in a box unused from the last time Apocalypse was released. I'd gotten very excited, bought it and then, through a combination of hobby butterfly syndrome and having all my stuff in storage for a couple of years, had done nothing with it. Trouble is, the last Emperor's Fist box was the 1994 pattern sprues and as such had one glaring problem that dated the kits horribly. The secondary weapons.


The top image is of the circa 1994 lascannon, the bottom one is the modern heavy weapons sprue lascannon. If you do Imperial Guard then you will have a stack of spare heavy weapons. Given that Guardsmen can just about hit the broad side of a barn, lascannons are not my favourites to arm the lads with and so I had a whole bunch. I realised that with a few hours of obsessive effort I could modernise the only substandard elements of the old '94 pattern Russ's and decided to document the process for you all.


First things first, remove the old lascannon from the housing. You want everything behind those coils. Clippers are the best tool for this and you'll quickly whip the lascannon halves off their respective halves of the cylinder in no time. Do this before you glue them together. It's easier.


Glue the halves of the cylinder together (those cheapy black and orange clamps you can get by the half dozen in any pound shop are the absolute bomb for this kind of work) and turn your attention to the donor weapon. Here we want everything in front of the second coil (there's a sort of sight box on top).


This time it is a razor saw for the win. The thin, stiff blade will make swift work of the cut and leave you with a perfectly flat surface. Unless you have a bright idea for what to do with the rear half then dispose of it.


Finally, tidy up the housing and glue the new weapon in place, lining up the brace with the bottom edge of the mount. You'll notice a small gap behind the weapon. You can fill this if you like but frankly, no one will ever see it.


The finished Russ's (and thank goodness they came with the old tank accessory frames) look ace. But I couldn't stop there. Just because I'm not using sponsons doesn't mean you won't be. So just for you dear readers. I made an updated heavy bolter as well:


Truth be told, there isn't a lot of difference here. Just slightly nicer furniture on the modern bolter. Once again, start this process with the halves unglued.


This time, the tool of choice is the mighty Chopper II. You can't beat it for clean, precise, vertical cuts. We remove the bolter componant and leave that little rib at the bottom.


The donor bolter gets razor sawed just behind the mount and then the mount is removed to allow it to fit the new location.


You'd honestly believe that it had been made for the location. With the barrel drilled out it is as good as anything from the baneblade. But I didn't stop there either.


I needed a vanquisher to lead the company (well, you do don't you?). So I scavved the modern vanquisher barrel from an online parts shop (can't remember which of the four I regularly use it was). Cut off the hexagonal mounting point, sawed off the original barrel at the brace and attached the longer vanquisher barrel to the cut. Easy.


I decided the Commissar's tank (an eleventh Russ) was going to be an exterminator, all the better to scythe down fleeing tank crews while leaving His Divine Imperator's equipment relatively unharmed. He'll also act as an anti-air vehicle fluff-wise. This was slightly more involved. Two donor autocannons - again from the heavy weapons sprues) were cut down and smoothed so that they glued together at the housing just behind the recoil bar. The battle cannon barrel was cut off with only a millimeter left sticking out to allow the cover plate to be fitted. Then I closed off the barrel end with a sort of "plus sign" of plasticard strip before glueing the autocannons into place.

Invading the planet Backyard as the only place big enough for the picture!

And there you have it. The Emperor's Fist company complete with a bonus Baneblade, Commissars transport and a medical Trojan. I'll add an Atlas recovery vehicle at some point but I'm delighted with what I have so far. Tremble enemies of the Emperor! Soon we'll have paint on us and the boom can begin!

Hopefully this has shown you that these sorts of modernisations and small conversions are not difficult. Just time consuming and allow you to get the best out of your models no matter how old. Until next time folks.

TTFN.