Thursday 29 March 2012

New Imperial Guard

Greetings all, I bring to you all a brand spanky new commission squad. These are working to the brief of using the WW2 German Flecktarn or "Oakleaf" pattern of camoflague.


The Flecktarn pattern is one of the most complex in camoflague design! Only the modern "digital" camoflague is harder to work with in my not-so-humble opinion. As always with a real world reference you need to start from some decent reference material.

Image from Trident Military

So initially it looks like a confused mess, how to begin painting that? In the end I figured out that it was layers of printing over the palest colour. The colours all have big blotches (technical term that) and then have small dots added onto the other blotches.


I started with Vallejo Grey-Green as a basecoat, this will look very, very bright but it gets drabbed down later. Over this basecoat I painted broad stripes of Vermin Brown, Vallejo Chocolate Brown and Vallejo German Camo Black-Brown. Once all these were in place I went back and painted dots of each colour onto the opposing stripes (so Grey-green dots on the Vermin Brown, Chocolate Brown and GCBB stripes and so on). By the time this was finished I was acutely aware that there was no way that normal highlighting was going to work without blood running from my eyes. Instead I washed the whole camo scheme with Devlan Mud which drabbed down the garish finish and put shading in the creases.


Most of the backpacks also got the Flecktarn treatment, the armour and pouches though needed to be something different or the models would just become a mess. The client had asked for a symbol based on the Wolverhampton Wolves logo as the regiments badge so with the combination of "Wolf" and "German Camo" bashing around in my brain there was only one real choice. Early war German Grey. The armour was therefore basecoated in Vallejo German Grey and highlighted with increasing amounts of Fortress Grey. This gave a neutral colour to allow the camo to come to the fore.


Other pouches (and this slightly different design backpack) were painted with Vallejo US Olive Field Drab to make a nice utilitarian khaki shade. This was later washed with Devlan Mud. Grenades were picked out in Vallejo Luftwaffe Green and washed in Badab Black to give a nice contrast.


The heads are Wargames Factory gas masked helms and look ace on these lads. The rubber fabric was painted with my usual method of Charadon Granite with a wash of Badab Black. You can also see the Wolf icon on the shoulder of this chap.

After a quick basing of urban rubble the squad was completed. I believe that this was the first test bed squad of an army so hopefully we will see more of these fine fellows soon! Until next time (which will be our 150th post!) I shall simply say:

TTFN

Friday 23 March 2012

Black Cat Bases pt 1

Recently I have been doing some work for Black Cat Bases as a sort of studio painter, the first fruits of my labours should be turning up on their site soon but I thought I would give you a sneaky preview:

Bamboo Floor
Cobblestone Street
Grid Floor
Roads and Pavements
Swamplands
Victorian Street

Now normally I would be taking you through all of the steps I used to create these effects but that is part of the job that I have done for Black Cat. Every base and every variant has a detailed step-by-step tutorial and they should be going up on their site soon. I'll be working through the other bases in their range over the next few months and then moving on to their model range too! Check out their site and I'll let you know when the tutorials go up. Till next time:

Mulder has kitty to play with

TTFN

Sunday 18 March 2012

Aren't you a little short for a Samurai?

Well that was quick! Four hours after deciding to paint the classic Citadel orientals they were done!


These fine fellows are both elderly Games Workshop Dwarf Adventurers (still available here). I'm using them to represent the Pathfinder classes and races of a Dwarf Samurai and a Gnome Ninja. Why a Gnome? Say it out loud... "Gnome Ninja". That's why! Something I forgot to mention last time was that all of my Oriental Adventures party are being based on these cool Black Cat Bases bamboo base inserts. They're cast metal and all sorts of nifty.


So, the Samurai first. The armour is actually sculpted in as authentic a manner as you can when you are dealing with fantasy! It represents a later period suit where solid breastplates had become the norm to try to defeat the rising power of the handgun. Yep, this armour was being worn in the 1600's, while Britain was fighting the civil war with muskets and cannon the Way of Horse and Bow (Bushido) was still king in Japan. I started off the model by giving the whole thing a coat of Boltgun Metal and Black which was further drabbed down with Badab Black. I wanted the metalwork present but to retreat behind the brighter colours of the silk bindings and laquered helmet.


Speaking of bindings, the red was my usual Blood Angels method shortened to: Mechrite Red and Blood Red mix basecoat, Blood Red overbrush, Blazing Orange and Vomit Brown mix highlights. In this case every line of silk in the armour needed to be highlighted individually. For those who don't know, Samurai armour is actually thousands of thick silk cords plaited and woven around steel plates. Silk is so good at slowing cutting edges that it was in the original bulletproof vests. This armour is perfect for resisting the slashing cuts so familiar to wielders of the katana. The plates helped to stop arrows from penetrating. I glazed the red cords in a mix of Red Ink and Glaze Medium and then picked out the yellow contrast threads in Tausept Ochre, a little white added for highlights and a Gryphonne Sepia wash sealed the deal.


Most of the sculpting was nice considering this model comes from the mid-eighties but the katana wasn't quite up to spec. To make this stand out - and to make it look different to a steel katana, thus solving the sculpting problem - I decided to make a jade sword. Jade is a magical stone to the Chinese and I thought I would use it as a Ghost Touch katana (it can hit etheral creatures). This was achieved with a base coat of Vallejo Scurf Green highlighted with increasing amounts of Bleached Bone. Incidently, those are furry boots and they also are perfectly authentic!


Sadly, the ninja sculpt has not weathered the passage of time so well. The arms are awful and a real indicator of just how far GW have come over their thirty years. Most of the painting was actually correcting and minimising the effects of the wonky sculpting so don't expect miracles in the close-ups!


Painting any model like this - ninjas, imperial asassins, policemen - is an exercise in making areas of adjacent black stand out. I discussed this at length in the Hot Fuzz article so I won't go through it all again, suffice to say that used Scorched Brown for the leather breastplate and mask, Adeptus Battlegrey and Charadon Granite for the cloth and then several washes of Badab Black!

With that the Oriental Adventures adventuring party is almost complete! Just the sumo to go and I'm going to try some serious tatooing on that bad boy...

TTFN
Friday 16 March 2012

Bushido Puppetmaster

Greetings all, today we can take a look at a model from one of the best new companies around. GCT Studios Bushido Puppetmaster.


GCT's sculpting is just beautiful, so finely cut. Their choice of subjects are really unusual and inspired by the coolest elements of oriental myth and legend. This fellow is joining my RPG models as a Shugenja - an Oriental Adventures wizard of sorts - with a speciality in summoning and mind control. When I was contemplating colour schemes for him I knew that I wanted turquoise in there somewhere but finding the other colours was more problematic. Look at the figure again, colour scheme works right? Now read out the colours: Turquoise, pink and orange. Would you have thought they went together? Neither did I until I broke out the trusty colour wheel.


Now a normal "Contrasting" colour scheme would pair turquoise with a reddish-orange. But I needed a second colour as edging. Thus I went with what is called a "Split-Complementary" scheme. This takes the two colours either side of the contrast colours and by using BOTH of them creates a balanced effect. Take a look at the small discs on the right. 'A' is just turquoise and orange, it sort of works but not as well as the blue-orange scheme (the teeny ones). 'B' adds the pink into the mix and suddenly the scheme works... go figure!


Another facet to consider was that there were essentially two figures in one model. I needed the female figure made of smoke to stand out clearly. Much like the harlequins I decided to do this with textural contrast, bright vs desaturated, chalky vs smooth. I also warmed up the usual skin tone by adding some Bronzed Fleshtone to the Tallarn Flesh. This helped it to stand out against the cold blue-grey of the smoke.


She is my favourite part of this figure, the sculpting is gorgeous and very feminine without being OTT. The smoke was painted first with a basecoat of Shadow Grey and Codex Grey mix and then highlighted with increasing amounts of Astronomicon Grey.


One more view of the smoke-girl, this time from the back! The other colours were fairly basic, Macharius Solar Orange with a Gryphonne Sepia wash for the orange. Hawk Turquoise washed with a mix of Thraka Green and Asurman Blue for the tunic. The pink needed to be quite soft, Dheneb Stone mixed with Red Gore and a Baal Red wash did the job nicely. I initially intended to do a whole bunch of freehanding on the clothing, once I started painting I decided that the sculpting should speak for itself.


The puppet was a really cute feature. It comes without any points of attachment to the hand and will look just fine without any connections. It would look like very thin string, invisible at this scale. I, however, wanted to attach strings to give another level of detail to the model. Mercifully I am good with knots and handy with a pair of tweezers!

That is the lot for this time. The Oriental RPG group is going to consist of this guy, a pair of old citadel dwarfs (one ninja, one samurai!) and another GCT model, the Bushido Sumo! He's going to be statted as a monk as the most appropriate class I could think of. Until next time then.

TTFN

Sunday 11 March 2012

Tutorial: Making FoW painting much, much easier

Greetings all, as some of you may know I have been recently corrupted to the painting of teeny tiny world war 2 soldiers in the form of Flames of War:


This has been largely the result of too many war films in my youth (and particularly The Longest Day a film so cool that Sean Connery is relegated to a walk-on part!) and some gentle prodding from Dice Jesus (Gareth from It's Game Over Man). I've settled on British paratroopers for my first army, with a Canadian armoured regiment to have some easy-to-paint Sherman's amongst all those flaming Denison Smocks. I've talked about painting these guys here, but am today going to talk about a device I've developed to make painting these tiny, tiny critters easier.


Alright, I'm sure that many of you are now thinking "Yes Jeff, that's a dowel pin, perhaps you are a little behind on your meds?" but stick with me! The problem when painting these 15mm figures is that if they are stuck to the base you can't get your brush into all the details. If they aren't stuck to the base then you can't hold on to them. I tried painting them double-sided sticky taped onto a card base but that got unwieldy. So after some thought the following idea dawned.


A short, fat peg (an 8mm dowel pin, perfect for my chunky fingers to hold) with a magnet glued to the base. Dowels are as cheap as chips. I got 50 of them for a couple of quid. The magnets are a bit more expensive but are invaluable as you will see later.


And voila! We have an FoW painting stick. The magnet keeps the top-heavy affair from falling over when you aren't painting it. Now, attaching the miniature is the tricksy bit. You can use blue-tac but it tends to flex away when drybrushing or release when it gets dry. Like for instance when you have stuck it to an absorbant wooden dowel... Double-sided sticky will work but is fiddly to get a piece to stick to the top of the dowel. Superglue will work but is the devil itself to remove and you risk damaging your model and/or your paint job removing it. The solution?

Used to be called "be still my Art". Why oh why did they change it?

This stuff is used in museums to hold their priceless artifacts to their pedestals and by people in earthquake-prone areas to stop their posessions imitating lemmings every time the ground shivers. Essentially it is a very low temperature melt wax - body temperature in fact. This means you can get a little piece. Roll it in your fingers until it is soft and squishy. Place it on the shelf, stick, pedestal, whatever and then quickly press the model into the wax. As it cools it grips.


You only need a tiny, tiny piece of wax for each model so the smallest 13oz tub is enough for years of painting! The larger tubs are big enough to bath a baby in so caveat emptor folks! Shop around as the cost of this varies considerably. I got it from a preservation supplies shop online so that's a good starting point. Americans should have much, much less trouble getting it as it is sold as QuakeHold over there. The best part is that at the end of painting a light twist-and-pull motion releases the wax's hold and frees your model. It is reusable too although you may need to add more from time to time.

use a steel ruler to arrange your painting project on

So for not a lot of dosh and in no time at all I made my painting life considerably easier. I'll be using these waxy-magnety-sticks for all sorts - cavalry riders, shields, heads, you name it. That's all for today folks. Happy painting.

TTFN

Tuesday 6 March 2012

Workbench tutorial: Rusting

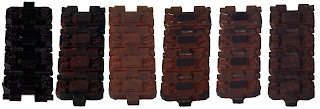
Greetings all, I talk a lot about weathering and rusting but I realised that until now I haven't done a proper tutorial on it. Today I fix that and talk about the four main methods of creating rusted metal out of plastic. I'm going to be using Imperial Guard tank tracks to demonstrate the methods. On each of the tracks you'll notice a little rubber pad on each track. These are to insulate the tank's suspension, engine and electronics from excessive vibration. They also are cheaper to replace than the entire steel track run. Extends the life of a track run by a few hundred miles. Each pad is painted by basecoating in Charadon Granite and washing with Badab Black. I mention this now because I will be leaving it out of the methodologies below to focus on the rust.

Method 1: "Bitzrust" (the simplest)


Bitzrust is the most straightforward of the methods. It creates a slightly unsatisfying rust but a fairly nice "heavy" metal feel. Bitzrust's method is as follows:

  1. Basecoat with Tin Bitz over a black primer.
  2. Drybrush with 50:50 mix of Tin Bitz and Boltgun Metal.
  3. Drybrush with Boltgun Metal.
  4. Wash with Badab Black.
There are problems with this method, it doesn't work in large quantities and doesn't really create a rusted feel. It is nice though to create a heavy, campaigning look in unrusted armour.

Method 2: "Charlierust"


Charlierust was created by Charlie Brassley of The Beard Bunker as a simpler version of my Jeffrust. Works as a nice quick rusting scheme with a much more satisfying feel than Bitzrust. It lacks the deep variation of tones that Jeffrust has but also doesn't take four stippling steps to achieve...
  1. Basecoat with Calthan Brown over a black primer.
  2. Drybrush with Boltgun Metal. Use a stippling motion on flat areas to create texture.
  3. Wash with Badab Black.
Best use for this method is where you need large quantities of rusted metal painted (y'know, Orks, Undead, Skaven etc) or where the metal will be covered with chipped paintwork and the effort of Jeffrust would be wasted.

Method 3: "Jeffrust"


This one is my baby (no Jeff, really? Jeffrust is yours? No kidding?) I developed it ages ago when I was painting Orks and Ogres. Lots of rust on them, I wasn't happy with the GW method that was around at the time and developed this in response. The method is as follows:
  1. Basecoat with Dark Flesh over a black primer. You may need two coats of Dark Flesh to achieve a solid coat of colour.
  2. Stipple on a layer of Vermin Brown. Use a partially dried brush to ensure that the Dark Flesh coat is visible beneath the Vermin Brown. I recommend using an old drybrush for this, don't use the so-called stippling brush. It has its uses but stippling isn't one of them...
  3. Repeat the stippling with Macharius Solar Orange (I used to use Blazing Orange before foundation paints existed). The MSO gives a lovely dusty feel to the orangey rust. Ensure that you use a drier brush than the previous step. You want to leave Vermin Brown and Dark Flesh visible under this layer.
  4. Drybrush Boltgun metal onto the rust with a stippling motion. This creates the sort of scrapes and dings that expose the bare metal through the rust. This step determines how rusted your finished piece looks. A light coat creates an ramshackle corroded look. A heavier coat creates a lightly corroded appearance.
  5. Wash the rust with Badab Black to define the shading.
This is - as you might imagine - my go-to method of rusting, I'm used to the multiple steps after all. Until used to it I recommend leaving this for the characters!

Method 4: "Powders" (the most complex)


I can't really pretend to be an expert here as I have just started using these. This is the preferred method of most of the 1/35 modellers out there. All of the powders mentioned are Forgeworld:
  1. Over a black primer or a coat of Vallejo Track Primer dust a heavy coating of Aged Rust. Brush off the excess.
  2. Dust another coat of Light Rust over the top of the Aged rust. Brush off and blend the excess.
  3. Dust a final coat of Orange Rust over the Light rust to add depth to the effect.
  4. Using a pencil, define the edges and highpoints of the rust.
  5. Finally dust the entire piece with a light coat of Light Earth to dirty the piece up.
This is the trickiest and messiest of all the steps. It creates a very realistic effect but it really isn't durable at all. It comes off on fingers, figure case foam etc. Might be one to use on the display figures.

There isn't a "best" method in this quartet. Only different ones that I use for different purposes. To find your favourite play with these and pick one! Alternatively invent your own and share the results with the world! That's all for now folks.

TTFN.

Thursday 1 March 2012

Come and join our merry band...


Hello all! Just a quickee today to invite you all to our new look facebook page. I've decided to expand how I use the FB page for Pirate Viking Painting and have it as a place for Mulder and I to share news and interesting models/companies/paint jobs that we find on the interwebs. Until now its really been just a place for saying "I've posted something!" not any more.

Click on the icon below to join up now: