Tuesday 23 August 2016

For Myrmidia, Averland and the Blazing Suns!

It's been a while since we've seen any of my own work (rather than commissions) so galloping over the hills come my latest addition to my Empire army, the Blazing Sun Knights.


The Blazing Suns are a knightly order of the Empire in the service of Myrmidia, goddess of strategy and war. She's very much a southern Empire/Tilean goddess, in the north much of her role is taken by Ulric. Given that Averland is very much in the south of the Empire, having a contingent of them seemed like a winner. Plus, Charlie also has a unit of Blazing Suns in his army and I wanted the political problem of brother knights on both sides of a civil war!

The models are a bit different to the regular run-of-the-mill Empire knights, they've had the heads replaced with Outrider heads - a significant improvement on the original - and I wanted Tilean-esque shields for another point of visual difference with the usual Empire "heater" shield shape. These were ancient Greek shields nicked off've one of Warlord Games Grecian sprues.


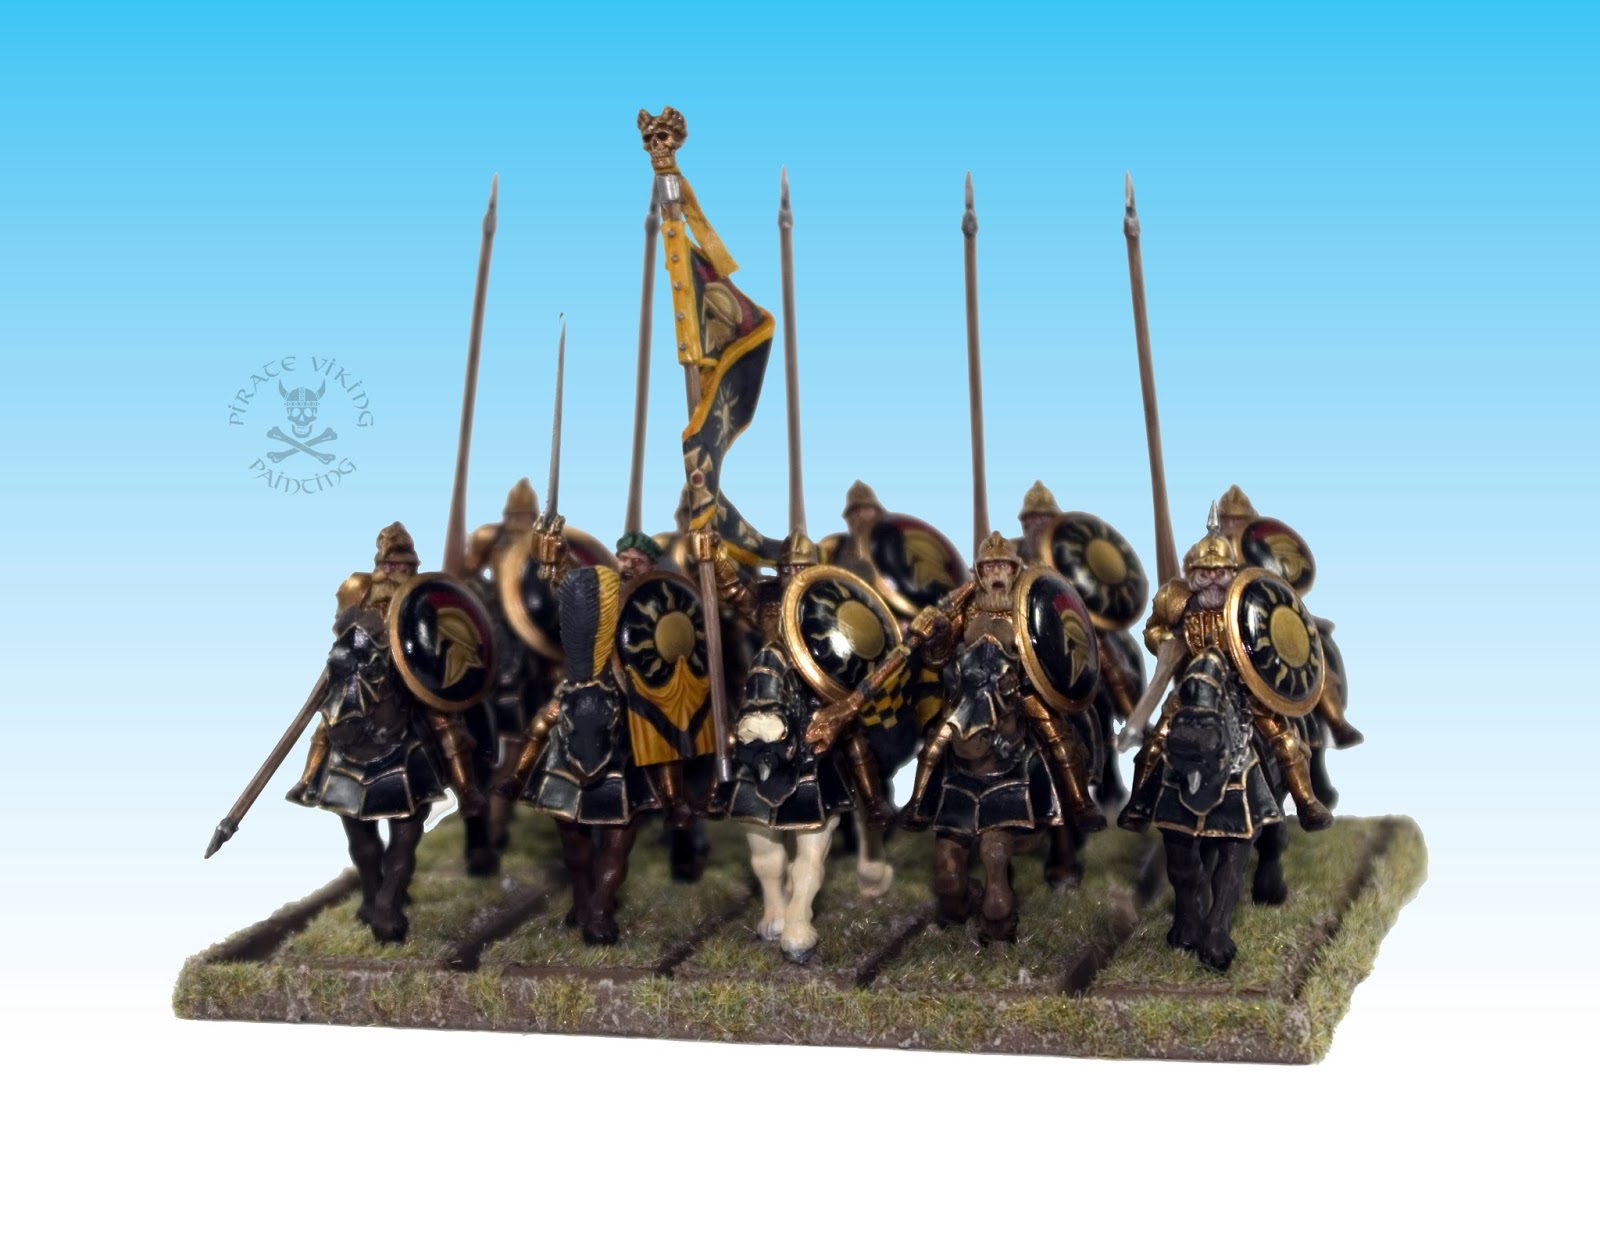
The shields are the most obvious parts of the models so we'll take a look at them first. Grecian shields being big flat areas, they rather cry out for some freehand work on them. The symbol of the Blazing Suns is, well, the blazing sun... but we've also used the Grecian style helm seen on depictions of Myrmidia as a symbol for the order. I mixed the two symbols about evenly through the unit and I think it added a nice touch of variety to the otherwise very uniform unit.


The symbols also repeat on That Banner. Let me say this: This banner can do one. It really can. It's a complete git to paint and I'm glad I've only got the one in the army. I added some of the Empire not-quite-Maltese crosses to the end of the pennant to finish off the design.


Other than the shields, painting wise, these models are fairly straightforward. Brass armour for that Blazing Sun bling, black and brass horse armour to prevent them being one giant gold-ish blob and the usual Averland colours on the cloth to indicate the allegiance of their chapter.


These have been a slow unit to complete, I think I started them about six months ago and every now and again I'd do a few layers and then put them aside again. However, for all the dear-gods-why of some of the freehand pain, I love this unit. They've got a lot of character and whilst clearly still being Empire knights they stand apart from the usual unit look. I like 'em!

More shinies soon,

TTFN

Monday 15 August 2016

Totally not an X-man, promise...

Heya folks, we're here again with a quick shiny for you, this time another cracking Hasslefree sculpt:


This one is Jynx, although I quickly began thinking of her as Scarlet Witch and had to work hard not to just go ahead and paint her like that! The concession to my mental picture was the glowing red eyes...


This one is part of the Green and Yellow gang that the Gunslinger and the Special Forces Dude belong to. So she needed a predominant green and black vibe with a touch of yellow thrown in. The yellow was going to be a problem for this model. Anywhere I looked the yellow wasn't going to work. Then I had a moment of inspiration. I could make the leather jacket more of a motorbike jacket and use some of the bright contrast patterning that's popular on bike leathers. This had the effect of making her even more of an X-man but worked nicely for getting that linking spot colour in. By the way, the dress is more intensely green but the camera said "no" to getting both the red and the green balanced and I don't like digitally manipulating just a part of the picture, feels like cheating!


Speaking of red, we need to natter about the face, she was in such an obvious "spellcasting" pose that I wanted something to indicate her power rather than just looking like a natty dancer. Glowing eyes fit the bill nicely. As usual, Object Source Lighting (OSL) is done mostly by building up layers of thin glazes. The trick is mostly where you do not light more than where you do. I talked about the basics of choosing a radius for the illumination etc waaaay back in 2011 (christ, 2011...) with my Blood Angels Librarian. The consideration here was realising where the face would be in "shadow" from the OSL, she reslly did not look right until I'd carefully rehighlighted the bridge of the nose and the brow. The light was spilling out rather than illuminating. I also made sure that the inside of her hair-do caught some light too, radius of illumination y'see?

That's all folks for another post, more shinies soon.

TTFN

Wednesday 10 August 2016

Headswaps 101

I realised the other day that it has been an absolute age since I last did any kind of tutorial, fortunately an opportunity has rather presented itself...


My client has two of these rather handsome totally-not-Hugo Weaving figures and we were debating which head would go nicely on the spare. We had a few options and none of them were really going right. Fortunately, I solved that problem the other day:


Yup, we suddenly realised that the head that I sawed off the Cadian officer would make a somewhat compelling option on there and I figured I'd take some photos on the way. These days, you see, we have lovely cleverly designed head swap systems both in plastic and metal. But back in the day, this is the only way we had:


First off, poor ol' Hugo gets decapitated. You could use clippers for this, or a fret saw, but the razor saw is quite simply the best choice for this job. It's farcically thin but stiffened by the ridge down the back. If you don't have one I urge you to buy one. Sadly, most are designed for woodworking and have rather large teeth, you need one with tiny teeth like mine.


So we've now got a decapitated Hugo and a head orphaned from it's body. I cleaned up the head, removing anything that was connecting to the torso, collar or neck of the original. Make sure to trim the jawline as it'll look very fat compared to it's original sculpt.


Sadly though, the angle is horribly wrong for the simple option of "just glue it on". That's not going to help at all. Instead, you need to fabricate a new neck. Best option is a long pin.


Just like the normal pinning process, you drill into both halves and use a bit of paperclip wire to bridge the gap. However in this case you want to do the exact opposite of the normal process and cut it to length in order to hover the head above the shoulders. Position is important here, best option is to treat it as the spine and drill in to both the skull and the torso roughly where the spine would be. Aim the hole toward the crown of the head and you won't go far wrong. It's then just the normal posing conundrum of "where exactly should this head's eyeline go?"


Yeah, ok, slightly disingenuous. It isn't just posing. There's rather a lot of neck to fill in there. At this point it's time to break out the sculpting putty of your choice. I tend to use ProCreate as the final grey colour doesn't jar with the plastic/metal so it's easier to see that you've got it right. Green often retreats visually and can leave you thinking that you've done something wrong. Often only when you prime the model can you be sure you've got it right. For people who do it all the time, they learn to compensate for this... I hardly ever sculpt, I use grey.


And there we have it! Original flavour Hugo on the left, new Captain Snooty McMonacle on the right. Sadly, his head is slightly overscale for his body but only slightly. Not the worst we've seen by a long way. Painting will come soon, but for now, that's all folks, more shinies to come soon.

TTFN

Wednesday 3 August 2016

Stiff backs and shiny sabres

Greetings shipmates, back again with another quick visit to my "out" tray. This time a rather lovely Death Korps/Cadian kitbash that just oozes "officer":


The donor model was the sadly long-OOP Cadian officer with the monocle and the sneer. Wonderful figure, but the client already had one and he's waaaay too distinctive to have twins of. So with a shiny-hatted Death Korps head in hand I went about decapitating the original and replacing it with the new resin head. Razor saws are the absolute win for that job. I've managed to save the head entirely so that's going back to the client for future projects.

dayum that one in the right caught the light!

As for painting? Well, I've painted so many of these brown DKK over the years that there really isn't much to natter about. Except that the brass was a bit of an experiment. I painted it as I normally do, brassy brass, highlighted with silver. For some reason the tone was just all wrong. Just way too brown this time. No idea why. I knew I needed to get that warm brass tone back so broke out the Casadora Yellow. One clean pass of the wash - acting more as a glaze as all GW washes do - was enough to warm that up nicely and give the shiny brass hat I was after. Very nice.

That's all for today folks, more shinies inbound soon

TTFN