Showing posts with label Project RPG. Show all posts

Thursday, 28 May 2015

Post 400! And a Golden Daemon!

Good grief, somehow this is the 400th post. These things creep up on you don't they? First of all, thank you to all who read the mad ramblings of a bloke in Cardiff painting little plastic mans. Second of all, I thought I'd treat myself to an otherwise pointless but enjoyable model:


Yep, it's the only Golden Daemon I'm ever likely to see! This was the - can you believe - 2006 Golden Daemon model (I worked that one as well), the severed head is the Golden Daemon that decorated the lovely paint sets that were the first I ever owned:


To my delight he's on the modern ones too! My nostalgia circuitry was well and truly tickled. Anyway, I am using this as part of Project RPG as a Dwarf Barbarian, an apparently rather successful one. Oddly enough, this model has one brilliant element and one slightly dodgy one so lets focus on the good bit first:


The extremely nifty severed Golden Daemon head. the puddle of blood comes sculpted on so subtlety is right out the window on this one. There was only one colour that I could possibly paint this daemon: Gold, of course. I used the pseudo-NMM method I usually use on cloth in order to avoid him looking like a Simpson's character. I was especially taken by the black eye, it hasn't photographed terribly well but the sculpt is lovely.


Sadly the Dwarf wasn't quite as well sculpted (sadly at the time limited edition models were often ones that had either failed "gold testing" - i.e. they just ate moulds - or were training models and the like. These days things are much better) so I just did a fairly basic job on him and allowed the eye to find the daemon head instead. There isn't a huge amount to say about him that hasn't been said on other slayer models so I'll talk briefly about blood. The axe was layers of thin streaks of Blood For The Blood God with increasing amounts of black ink mixed in. For the base I also added a glaze of my older red & chestnut ink mix to the groundwork.

And there you go! Something fun for the 400th post. Here's to many, many more. Next time it will be more thunderbolt progress (they're really coming on now).

TTFN

Saturday, 21 September 2013

Druids and Tendons and Bears, oh my!

Hi de hi campers, I've actually got new models to show you, gasp!


So, for those who don't follow my trials and tribulations on either facebook, twitter or the Today I've Mostly Been tumblr that feeds the other two... I've been having problems this week. About two years ago I developed an RSI in the tendons in the back of my wrist. Turns out painting for 8-12 hours a day was a bad idea. The burning pain convinced me to take some time off, cut back on my hours with brush in hand and all was well. Until a fortnight ago when it came back. Well, this time, there was no way on earth I was letting it get to the debilitating pain stage. Off to the doctor's I pop. I now have spanky anti-inflammatories (not your daddy's ibuprofen I can tell you) and referrals to the physio who'll hopefully be able to blitz the tendons with ultrasound and free them up. Until then, though, I still have to be able to work. So the rest of this week has been tentative experiments to see how smoothly and how long I can operate. The results are the dynamic duo above!

These two are the start of the next phase of Project RPG, this is an attempt by me to have a model to represent every class from the Pathfinder RPG. There's a fair few of them and I've divvied them into a few different adventuring bands. The Druid and his grizzly bear animal companion are the start of the third team.


The Druid is the old (possibly antique) Citadel Truthsayer from the Albion campaign. I didn't change a darned thing about him as the design was pretty much perfect. I decided to use a darker, more tanned skin recipie for this chap as the outdoors life plus clothes aversion would suggest it! I have to once again put a big shout out to GW's flesh tones. They got a few things wrong with the new range but whoa, the flesh is brilliant. Bugman's Glow was shaded with Reikland Fleshtone, then hightlights were built up from Bugman's through Cadian Fleshtone and into Kislev Flesh for the highest highlights. Some of the blending is a little clumsier than normal (and oh dear god did he take longer to do than normal, I'd generally say 5-6 hours for something like this, this week? Closer to 10. Sheesh) but I like the overall effect.


I kept most of the rest fairly simple, I wanted him to look primitive, not covered in bling. So bronze jewelry, simple linen cloth (karak stone) and undyed leather. The bear teeth around his neck bind him to his companion visually. As is normal for me, once I've figured something out it tends to turn up a lot so the little terracotta pot at his belt uses the same Val Saddle Brown and Deck Tan mixes that I used on the goblin doom diver crewman. The glass bottle was Incubi Darkness, glazed with black ink and rehighlighted with Incubi Darkness. The liquid inside was one of the reds mixed with Incubi Darkness to tint the colour of the liquid with the colour of the bottle. A couple of catchlights (lines rather than dots) and a gloss varnish finish it off. God's knows what's in it, Druid Fluid probably (badum tish).


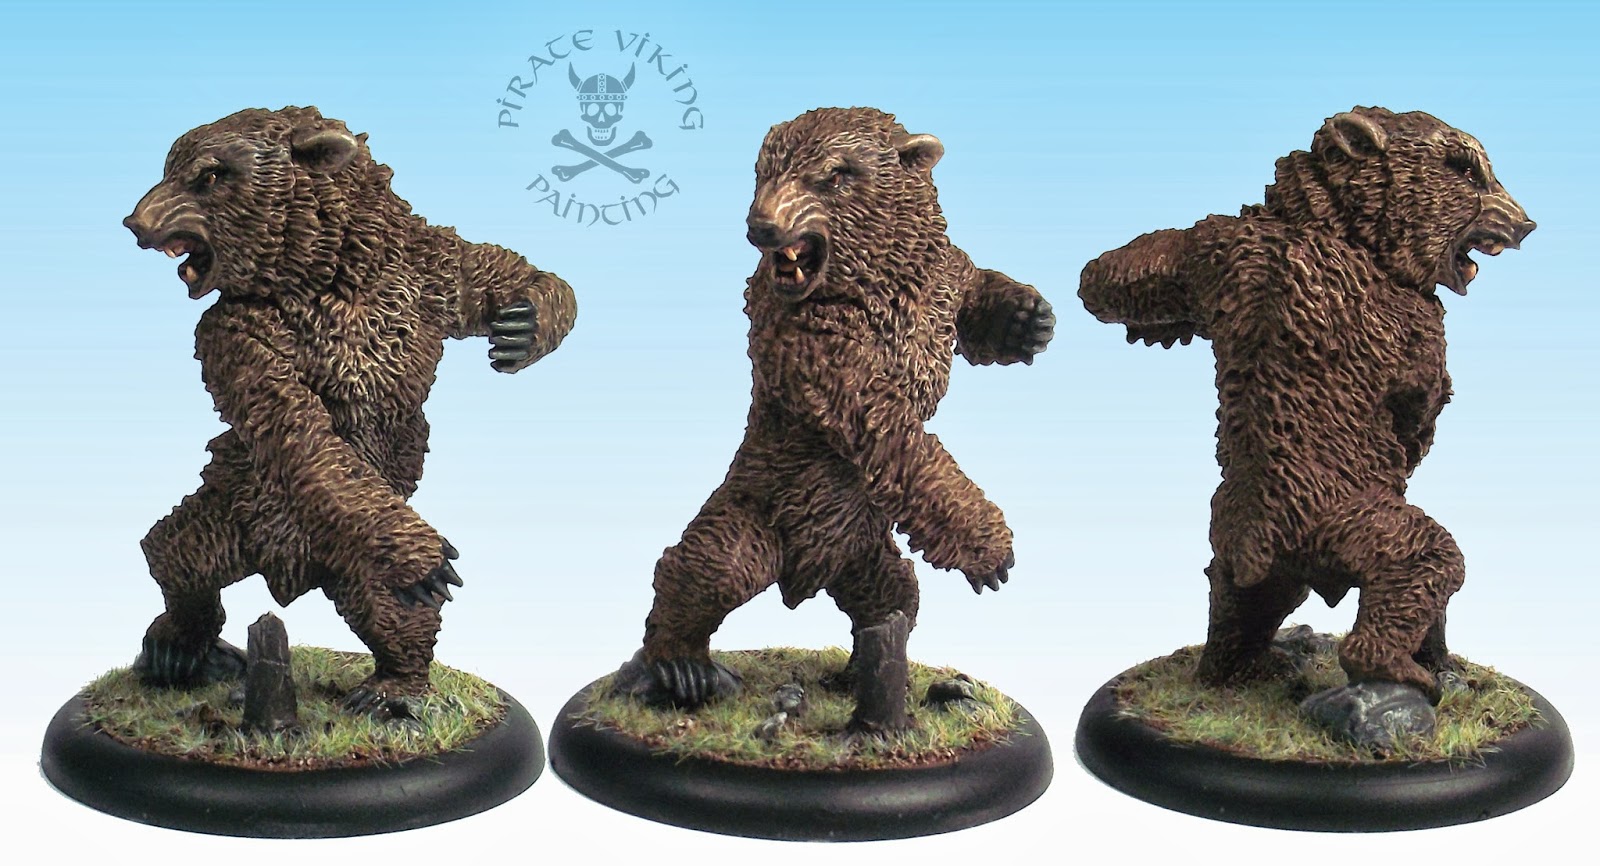
His leetle friend is a Reaper Dire Bear. Love this sculpt, and it's actually a proper size for a normal grizzly, never mind a dire bear! Something I realised with this model is that I just love painting animals. I love getting the subtle changes in tone (that the camera then ignores) between different areas of fur, getting the eyes right, everything. It ties in to my preference for painting monstrous creatures as the huge versions of the real thing (way scarier). This chap was fairly simple, I used the Vallejo browns as they are a little less saturated and by mixing different shades (I can't tell you, I just don't know, I keep the paint wet and just change the tone by adding different colours so the whole model feels like one continuous colour that just changes shade) achieve the ruddier back, lighter chest and belly and facial markings that characterise a grizzly.


Visual reference is essential when painting animals. You've seen hundreds of examples over your life and will subconsciously know when something is "wrong" even if you couldn't say what it was. For instance, in this case, the black patches on the mouth and gums (wash Nuln Oil over Bugman's Glow), the orangey bone teeth, the black nose, the dark eyesockets, the hazel eyes. All things very characteristic to Grizzly's and help to make the model work.

So, that's that! The test models are pretty and are just about there quality wise (the flesh on the druid is the best place to see where the stiffness in my wrist causes the problems) to allow me to get back to work Monday. I'll be ditching the eldar vehicles for now (the hexes are a problem) and do some of the infantry to give my wrist time to heal. Shorter bursts but progress can now be made. Huzzah!

TTFN

Friday, 24 August 2012

A ton and a half of trouble

Hi folks! Some of you might remember I was on a bit of an oriental kick a few months back with another D&D party. Well, I've finally got the fourth member finished:


Yep, big fella at the front is a GCT Studios Bushido Sumo. He's called Mikio on their site and is being used as a monk in my Oriental Adventures party. Monks in D&D are usually portreyed as being lithe Bruce Lee types, they fight with their fists and eschew armour for mobility. Well, thought I, why can't the rules support a different sort of monk? A bit of fiddling later and it turns out that Sumo wrestlers make perfect Monks, just stear clear of the nippy feats! But now the important bit, painting:


Once again, GCT have outdone themselves on the sculpting, this fella is a dream to paint. I started, obviously enough with the skin. Unusually for me a white undercoat was the primer of choice. I knew that the tone of the skin and the vibrancy of it would make or break this paint job. The method for the skin was the same as the 54mm Ninja and seems to have worked nicely. Essentially adding some Vallejo Bronze Fleshtone to your normal skin tone knocks the skin colour that step sallower needed for oriental flesh. Hmm, that was a complex sentence...

The various scars and scratches are easy these days, just give them a basecoat of Bugman Glow and highlight with a little bone added, simples. What was less simple was the tattoo. Now, I cannot give you a blow by blow of what I used, how and when as it was one of those organic processes. I can however tell you the philosophy behind the process. I started by laying out the orange carp in roughly the right positions. Every paint colour used had a little flesh colour mixed in. I then blocked in the dark turquoise water and started adding abstract splashes and swirls in a whiter shade of the water colour. I then added the yellow-ey fins of the carp and the darker details of their faces. The scales were hinted at with a stippling of lighter shades of the carp base colour. Finally I added some lotus-ish flowers floating in the water as there wasn't enough colour by that point. The last stage was a bit of a "squeeky bum time" as the Doctor would call it. I glazed the whole thing with a couple of VERY thin layers of the basic fleshtone. This knocked down the vibrancy of the colours and seemingly pressed the design beneath the top layer of skin. Turned out alright in the end.


It's easy with tattoos and the like to try to put too much detail in and loose the overall sense of the design in a mess of lines and details. Instead I went for almost an "abstract" version of the classic carp sleeve, something that gives the impression of the design and allows the viewer to fill in the blanks.

Turns out there isn't much more to tell on this fella. The skin and tattoo are pretty much the whole story! With the Oriental Adventures party complete I am a step closer to having my mad plan of possessing a model for every single class in the Pathfinder rules set! The workometer looks like this:


Need to decide which party to paint next really. I'm drawn to Group 2 as that means that I will be working on the stunning Studio McVey Seraphine model as an Oracle. Sounds like my mind is made up folks! Until next time,

TTFN

Sunday, 18 March 2012

Aren't you a little short for a Samurai?

Well that was quick! Four hours after deciding to paint the classic Citadel orientals they were done!


These fine fellows are both elderly Games Workshop Dwarf Adventurers (still available here). I'm using them to represent the Pathfinder classes and races of a Dwarf Samurai and a Gnome Ninja. Why a Gnome? Say it out loud... "Gnome Ninja". That's why! Something I forgot to mention last time was that all of my Oriental Adventures party are being based on these cool Black Cat Bases bamboo base inserts. They're cast metal and all sorts of nifty.


So, the Samurai first. The armour is actually sculpted in as authentic a manner as you can when you are dealing with fantasy! It represents a later period suit where solid breastplates had become the norm to try to defeat the rising power of the handgun. Yep, this armour was being worn in the 1600's, while Britain was fighting the civil war with muskets and cannon the Way of Horse and Bow (Bushido) was still king in Japan. I started off the model by giving the whole thing a coat of Boltgun Metal and Black which was further drabbed down with Badab Black. I wanted the metalwork present but to retreat behind the brighter colours of the silk bindings and laquered helmet.


Speaking of bindings, the red was my usual Blood Angels method shortened to: Mechrite Red and Blood Red mix basecoat, Blood Red overbrush, Blazing Orange and Vomit Brown mix highlights. In this case every line of silk in the armour needed to be highlighted individually. For those who don't know, Samurai armour is actually thousands of thick silk cords plaited and woven around steel plates. Silk is so good at slowing cutting edges that it was in the original bulletproof vests. This armour is perfect for resisting the slashing cuts so familiar to wielders of the katana. The plates helped to stop arrows from penetrating. I glazed the red cords in a mix of Red Ink and Glaze Medium and then picked out the yellow contrast threads in Tausept Ochre, a little white added for highlights and a Gryphonne Sepia wash sealed the deal.


Most of the sculpting was nice considering this model comes from the mid-eighties but the katana wasn't quite up to spec. To make this stand out - and to make it look different to a steel katana, thus solving the sculpting problem - I decided to make a jade sword. Jade is a magical stone to the Chinese and I thought I would use it as a Ghost Touch katana (it can hit etheral creatures). This was achieved with a base coat of Vallejo Scurf Green highlighted with increasing amounts of Bleached Bone. Incidently, those are furry boots and they also are perfectly authentic!


Sadly, the ninja sculpt has not weathered the passage of time so well. The arms are awful and a real indicator of just how far GW have come over their thirty years. Most of the painting was actually correcting and minimising the effects of the wonky sculpting so don't expect miracles in the close-ups!


Painting any model like this - ninjas, imperial asassins, policemen - is an exercise in making areas of adjacent black stand out. I discussed this at length in the Hot Fuzz article so I won't go through it all again, suffice to say that used Scorched Brown for the leather breastplate and mask, Adeptus Battlegrey and Charadon Granite for the cloth and then several washes of Badab Black!

With that the Oriental Adventures adventuring party is almost complete! Just the sumo to go and I'm going to try some serious tatooing on that bad boy...

TTFN

Friday, 16 March 2012

Bushido Puppetmaster

Greetings all, today we can take a look at a model from one of the best new companies around. GCT Studios Bushido Puppetmaster.


GCT's sculpting is just beautiful, so finely cut. Their choice of subjects are really unusual and inspired by the coolest elements of oriental myth and legend. This fellow is joining my RPG models as a Shugenja - an Oriental Adventures wizard of sorts - with a speciality in summoning and mind control. When I was contemplating colour schemes for him I knew that I wanted turquoise in there somewhere but finding the other colours was more problematic. Look at the figure again, colour scheme works right? Now read out the colours: Turquoise, pink and orange. Would you have thought they went together? Neither did I until I broke out the trusty colour wheel.


Now a normal "Contrasting" colour scheme would pair turquoise with a reddish-orange. But I needed a second colour as edging. Thus I went with what is called a "Split-Complementary" scheme. This takes the two colours either side of the contrast colours and by using BOTH of them creates a balanced effect. Take a look at the small discs on the right. 'A' is just turquoise and orange, it sort of works but not as well as the blue-orange scheme (the teeny ones). 'B' adds the pink into the mix and suddenly the scheme works... go figure!


Another facet to consider was that there were essentially two figures in one model. I needed the female figure made of smoke to stand out clearly. Much like the harlequins I decided to do this with textural contrast, bright vs desaturated, chalky vs smooth. I also warmed up the usual skin tone by adding some Bronzed Fleshtone to the Tallarn Flesh. This helped it to stand out against the cold blue-grey of the smoke.


She is my favourite part of this figure, the sculpting is gorgeous and very feminine without being OTT. The smoke was painted first with a basecoat of Shadow Grey and Codex Grey mix and then highlighted with increasing amounts of Astronomicon Grey.


One more view of the smoke-girl, this time from the back! The other colours were fairly basic, Macharius Solar Orange with a Gryphonne Sepia wash for the orange. Hawk Turquoise washed with a mix of Thraka Green and Asurman Blue for the tunic. The pink needed to be quite soft, Dheneb Stone mixed with Red Gore and a Baal Red wash did the job nicely. I initially intended to do a whole bunch of freehanding on the clothing, once I started painting I decided that the sculpting should speak for itself.


The puppet was a really cute feature. It comes without any points of attachment to the hand and will look just fine without any connections. It would look like very thin string, invisible at this scale. I, however, wanted to attach strings to give another level of detail to the model. Mercifully I am good with knots and handy with a pair of tweezers!

That is the lot for this time. The Oriental RPG group is going to consist of this guy, a pair of old citadel dwarfs (one ninja, one samurai!) and another GCT model, the Bushido Sumo! He's going to be statted as a monk as the most appropriate class I could think of. Until next time then.

TTFN

Monday, 1 August 2011

First adventuring Party finished!


So here it is: the first adventuring party all finished! Adding a halfling rogue and a bard to the cleric and barbarian finishes the group.


The Bard is the Marco Columbo miniature that Games Workshop released when the Lustria campaign was at its height. I thought he would make a marvelous bard, clutching inkpen and sheaves of scrolls to record stories and tales. I decided that the colour pallete would be a very warm orange-red. The clothing was pretty much Blood Angels red technique and the orange was Blazing Orange over a Macharius Solar Orange basecoat. A Gryphonne Sepia wash warmed the colour and gave it some shade and Kommando Khaki mixed with the Blazing Orange highlighted it. I used turquiose as a contrast colour on the gems and the feathers are painted as peacock. Weirdly the camera has not picked that up at all!


I am really happy with the bottle. Started from Orkhide Shade, added black for the shade and white for the highlights. The initial shading done I mixed Blood Red with Orkhide shade and painted in the potion making sure that the level followed gravity! I left a thin line of green/black underneath to indicate a thick walled vessel. I then added a long curved catchlight of Orkhide Shade and white to bind the two colours together. A skin of gloss varnish sealed the deal and the effect was complete.


I used more severe contast in the skin than I would have usually to indicate a weather-beaten complexion. The sculpting on the face was lovely, he even has sculted crows feet! Made painting him really enjoyable.


The rogue, by contrast, was a necessarily simple job! The model is only about 15mm tall after all. I used a Peregrin Took from the Lord of the Rings range. I was keen to make him look very different from the Pippin paintjob, this started with the colour pallete. Rather than the greens and browns associated with the Shire I used blues and greys to make him seem more stealthy and "urban".


His face is oh-dear-god tiny so there is only so much you can do! The eyes were the best I could do with a 5/O brush as they are probably half a millimeter across. To give him a rogueish look and to further distance him from happy-go-lucky Pippin I added heavy stubble using the method discussed in the Barbarian entry.

Well, that wraps it up for team one. There are another 2 regular fantasy adventuring parties in the works and an oriental adventures group featuring a Dwarven Samurai and Ninja. Ah, good times. Till next we meet folks...

TTFN

Wednesday, 27 July 2011

Cleric-al Errors

Now I know what you are thinking... "Jeff, I thought you were finishing the Blood Angels, that looks a lot like a D&D Cleric..."


I think I may be suffering from Angel fatigue combined with that "only two models left and it is all over" feel. So instead of a drop pod (shudder) and a pretty Sanguinary Priest with jump pack we have a Cleric! The model is an Ulric Warrior Priest from the Empire range. I loved the wilder look, an old faith with a winter god vibe. For his robe I nicked the excellent drab green colour developed by Andy "Lair of the Breviks" Walker (ta Andy!). I'll let you find the method on Andy's site but suffice to say it blends all the way from Charadon Granite, through Catachan Green up to almost Dheneb Stone. I wanted the armour to look battered and travel worn so blended up the highlights from Tin Bitz up to Chainmail, there is no texture on these armour plates, it is all done with the brush.


The other key feature is the wolf pelt. I used a "grey" wolf as reference - they really are not grey - and mixed colours to match. The main colour is a 2:1 mix of Khemri Brown and Astronomicon Grey with a Devlan Mud wash.


It is always worth having visual references when painting animals. They always have way more complicated colour schemes than you imagine and because you have seen a lot of pictures - or the real thing - a wrong scheme will always look wrong.


Like the armour I wanted his holy tome to seem used and beaten. I started with Dark Flesh and then washed it with Baal Red to give a vegetable-dyed red feel. Then I went back in and added scratches and worn edges with a Dark Flesh and Bleached Bone mix.


I agonised over hair colour for a while, to contrast with the green robe and the grey-brown of the wolf pelt I settled on a red-brown. A basecoat of Vermin Brown was highlighted with Vermin Brown and Bleached Bone mix and washed with a 2:1 mix of Devlan Mud and Baal Red. This creates a lovely realistic red hair, his skin was my usual character mix with a small amount of Snot Green for his irises.

Won't make any promises this time! Could be more D&D figures, could be the final Angels! Who knows? I am filling time until the next round of commission work arrives so I am pleasing myself. Until next time...

TTFN

Tuesday, 26 July 2011

Barbarian Horde (of one)

Taking a leaf out of Carmen's Fun Painty Time's book, I have decided to paint some characters designed to represent classic D&D classes. For openers I took advantage of Heresy Miniatures recent sale to grab one of Andy's brilliant Dynamic Big Boris models to be my quintessential Barbarian:


I wanted to use this model to practice stubble and body hair techniques listed in 'Eavy Metal's "Face Painting Redux" article. I used my standard method of painting skin for the 95% of the model that is naked. This is summerised as follows: Two thin coats of Tallarn Flesh as a basecoat; wash of Ogryn Flesh; deep shading wash of Devlan Mud; thinned Tallarn Flesh highlight; 3:1 mix of Tallarn Flesh and Bleached Bone highlight; thinned wash of Ogryn Flesh; repeat highlights; continue to add Bleached Bone to the mix for increased highlighting. I left the skin tone a bit darker than normal as suntanning is pretty much inevitable when all you wear is a skimpy loincloth.


To finish off the face I painted the lips and nipples Vallejo Tan and then added Bleached Bone to highlight. Body hair and stubble were achieved with very thinned washes of a 1:1:1:1 mix of Tallarn Flesh; Fortress Grey; Chaos Black and Scorched Brown. To indicate the chest hair I streaked the wash with a thin brush.


It is important to keep shaved hair and beard to appropriate areas of the head. This is relatively easy to achieve if you are a post-pubescent male as you can just look in the mirror. Otherwise, Google will supply endless appropriate images.

To join the Barbarian (haven't named him yet, any ideas in the comments section!) in the first adventuring party will be a human Bard and Cleric and a halfling Rogue. These guys are forming light relief in between longer projects and are a very satisfying project to work on! Next time should be the last of the Blood Angels, until then...

TTFN