Wednesday 27 July 2011

Cleric-al Errors

Now I know what you are thinking... "Jeff, I thought you were finishing the Blood Angels, that looks a lot like a D&D Cleric..."


I think I may be suffering from Angel fatigue combined with that "only two models left and it is all over" feel. So instead of a drop pod (shudder) and a pretty Sanguinary Priest with jump pack we have a Cleric! The model is an Ulric Warrior Priest from the Empire range. I loved the wilder look, an old faith with a winter god vibe. For his robe I nicked the excellent drab green colour developed by Andy "Lair of the Breviks" Walker (ta Andy!). I'll let you find the method on Andy's site but suffice to say it blends all the way from Charadon Granite, through Catachan Green up to almost Dheneb Stone. I wanted the armour to look battered and travel worn so blended up the highlights from Tin Bitz up to Chainmail, there is no texture on these armour plates, it is all done with the brush.


The other key feature is the wolf pelt. I used a "grey" wolf as reference - they really are not grey - and mixed colours to match. The main colour is a 2:1 mix of Khemri Brown and Astronomicon Grey with a Devlan Mud wash.


It is always worth having visual references when painting animals. They always have way more complicated colour schemes than you imagine and because you have seen a lot of pictures - or the real thing - a wrong scheme will always look wrong.


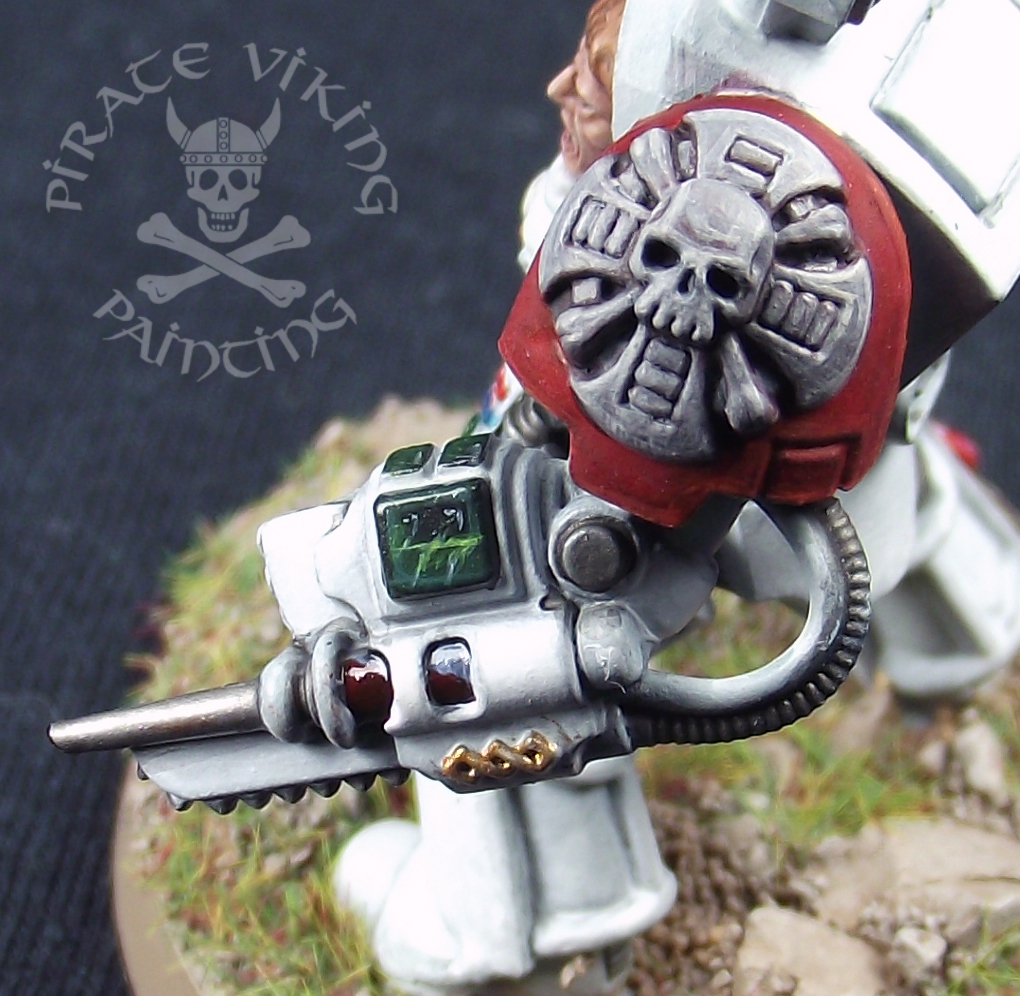
Like the armour I wanted his holy tome to seem used and beaten. I started with Dark Flesh and then washed it with Baal Red to give a vegetable-dyed red feel. Then I went back in and added scratches and worn edges with a Dark Flesh and Bleached Bone mix.


I agonised over hair colour for a while, to contrast with the green robe and the grey-brown of the wolf pelt I settled on a red-brown. A basecoat of Vermin Brown was highlighted with Vermin Brown and Bleached Bone mix and washed with a 2:1 mix of Devlan Mud and Baal Red. This creates a lovely realistic red hair, his skin was my usual character mix with a small amount of Snot Green for his irises.

Won't make any promises this time! Could be more D&D figures, could be the final Angels! Who knows? I am filling time until the next round of commission work arrives so I am pleasing myself. Until next time...

TTFN

Tuesday 26 July 2011

Barbarian Horde (of one)

Taking a leaf out of Carmen's Fun Painty Time's book, I have decided to paint some characters designed to represent classic D&D classes. For openers I took advantage of Heresy Miniatures recent sale to grab one of Andy's brilliant Dynamic Big Boris models to be my quintessential Barbarian:


I wanted to use this model to practice stubble and body hair techniques listed in 'Eavy Metal's "Face Painting Redux" article. I used my standard method of painting skin for the 95% of the model that is naked. This is summerised as follows: Two thin coats of Tallarn Flesh as a basecoat; wash of Ogryn Flesh; deep shading wash of Devlan Mud; thinned Tallarn Flesh highlight; 3:1 mix of Tallarn Flesh and Bleached Bone highlight; thinned wash of Ogryn Flesh; repeat highlights; continue to add Bleached Bone to the mix for increased highlighting. I left the skin tone a bit darker than normal as suntanning is pretty much inevitable when all you wear is a skimpy loincloth.


To finish off the face I painted the lips and nipples Vallejo Tan and then added Bleached Bone to highlight. Body hair and stubble were achieved with very thinned washes of a 1:1:1:1 mix of Tallarn Flesh; Fortress Grey; Chaos Black and Scorched Brown. To indicate the chest hair I streaked the wash with a thin brush.


It is important to keep shaved hair and beard to appropriate areas of the head. This is relatively easy to achieve if you are a post-pubescent male as you can just look in the mirror. Otherwise, Google will supply endless appropriate images.

To join the Barbarian (haven't named him yet, any ideas in the comments section!) in the first adventuring party will be a human Bard and Cleric and a halfling Rogue. These guys are forming light relief in between longer projects and are a very satisfying project to work on! Next time should be the last of the Blood Angels, until then...

TTFN

Thursday 21 July 2011

We're gonna need a bigger strait jacket....

Hey folks, been a manic week here at PVP HQ but I have been able to squeeze in a quick figure, a Death Company Dreadnought:


Remember these lunatics? Well, just as regular Blood Angels can turn crazy and need to be destroyed in the white hot fires of combat so can their Dreadnoughts. Oops. This fellow is one such lunatic, as a result his compassionate bretheren tool him up with lethal close combat weapons and hurl him at the enemy hoping that eventually some of them will take him out and save them the task!


I deliberately kept the paint scheme very simple, I don't intend to use this chap all the time (in truth, there was a dreadnought shaped space in the figure case. I had the spare parts from the Furioso and an old dreadnought lying around and one thing led to another...) so didn't want to spend ages on him. I wanted the red saltires to be the focus of attention and wrapped them around the shoulder plates to help him look his best from any angle. I also refined my black painting method mentioned in the Chaplain article by adding a few drops of black ink to the Badab Black wash to intensify the colour and help avoid the greying effect of the drybrushing. I am really considering a quick black Space Marine army just because this technique is so very fast.


A view that Games Workshop don't show of this kit. I can't understand why?! The detailing on the Magna Grapple is cool! It's got little wheels to guide the cable, cable reels to store the tethers and the grapples themselves are pretty cool too.

Well, that is it for this post, for those keeping track there are only two models left to paint for my 4000 points of Blood Angels, another Sanguinary Priest and the last Drop Pod. I am really going to have to nail down what the next big project for me will be. Might have to do some "gang sized" projects to cool down from the 4000 point paint fest that the Blood Angels have been. Until next time everyone

TTFN

Wednesday 13 July 2011

Knights in White Satin...

Or, y'know, Power Armour. Couldn't resist the opportunity for a Moody Blues quote. Today I present the first of two Sanguinary Priests:


These are the holy medics of the Blood Angels. The scientific magicians who perform the transformation of children into the Astartes. Most chapters have their apothecaries but the Blood Angels elevate theirs to the status of priests within the sanguinary cult. White is the mark of the apothecary and creates two problems, first is the fact that white is just the hardest colour to paint and a nightmare to photograph. Thus the photos lack their customary backdrop (just try cutting the model out of the image in Photoshop if you are wondering why) but at least the black cloth backdrop shows him off.


My method for painting white has only just been perfected (almost) with this figure. It is enormously labour intensive but the only way I have found to achieve a nice clean white. It starts with a couple of thin layers of Astronomicon Grey to establish a smooth base coat. Once dry it is shaded with a thinned Codex Grey in the recesses. Highlights are built up in layers starting with a 4:1 mix of Astronomicon Grey and Skull White and then built up with increasing amounts of white over 5 or 6 layers. Finally ten or so layers of very thin white are applied to achieve a clean finish. So, yeah, twenty or so layers of paint to achieve a clean shaded white. Like I said; labour intensive.


The stone crux terminatus was painted following the guide in White Dwarf for the Space Hullk terminators. The Grey Knight Narthecium was lovely to paint, the screens and blood vial look really nice.


I painted his face a little darker than usual to better contrast the white. The lenses are painted with my usual lens mix of Fenris Grey shaded and highlighted and then gloss varnished. The red shoulder pads link the Sanguinary Priest thematically to the army and also to the Terminator Squad that he will be joining.

 There is another Sanguinary Priest in the offing (this one with a jump pack) but he will be a reward for finishing the next Drop Pod. Till next time then:

TTFN

Tuesday 12 July 2011

Drop Pods (at last!)

Greetings all. Given my usual pace at painting vehicles I confidently predicted - not so long ago - that I would have three drop pods painted and ready to go in no time. A hollow laugh rings around the room... a week later, I have one drop pod finished. So here it is!


I added a spare Baal Predator Icon to the outside to give it a bit more Blood Angel character. Painting started with layers of Tin Bitz, Boltgun Metal and Chainmail applied followed by Badab Black. Over this went the first couple of layers of my Blood Angels red scheme. I stopped at Blood Red though as the heavy weathering would cover all the top level highlighting.


The interior was handled in the same way with Iyanden Darksun and Black hazard lines run down the internal door surfaces. These are tedious but fairly easy for Drop Pods, just measure and mark off half centimetre check marks all along both sides of the stripe. Connect them diagonally with a thin brush and black paint, fill in alternating stripes and you are done. A radar display in the centre of the column finished off the look.


Lastly came heavy weathering to indicate the drop pods mode of entry to the battlefield (for those that don't know a drop pod is kind of like the old Apollo and Soyuz re-entry capsules from the 70's. A heat resistant capsule that plummets out of orbit and then uses retro jets to slow down the capsule before impact). All the weathering was achieved by damp overbrushing in streaks starting at the base and pulling upwards. Graveyard Earth was liberally applied followed by Bestial Brown, Scorched Brown and Chaos Black in ever decreasing amounts. The same colours were stippled on the base to indicate the burning. I debated making the interior dirty but then decided that the crew would have sealed them in on the orbiting starship - so clean - and then the impact would have billowed the dust outward rather than in. Clean it is then!

Thankfully the remaining two drop pods have no interior fixings as they have been assembled to be dreadnought pods. Much simpler to paint. I hope!

TTFN

Friday 8 July 2011

Announcing ClixFix

Please note, this service, like all other PVP services, is no longer available.

Here's a new venture from us here at Pirate Viking Painting, recently I came into possession of a job lot of HeroClix figures. Now I had previously completely ignored the various 'Clix ranges as I had always been put off by the pre-painted aspect. As I looked at the figures I realised that under that daubed on paint was a series of nice miniatures horribly let down by its presentation. Thus the idea for ClixFix was born.


The pair of figures above are both Beast from the X-Men, in case it isn't clear, the one on the left is the HeroClix. The one on the right is the one that has been through the ClixFix process and repainted by me. Removing the paintwork from the HeroClix figures is something of a trial and I won't bore you with the particulars but it essentially boils down to labourious effort and some nasty chemicals (I own substantial protective gear now!). Strip with careful layers of acetone and cotton buds (Q-tips). Once stripped down the detail that the sculptor has put in becomes evident.


Now because I don't play the Clix games I decided to rebase my Beast on a Black Cat urban display base. Should clients require it I can easily re-attach it to the original base.


The pose is wonderfully dramatic and the musculature is brilliant. He really captures a sense of motion and power.


Changing small details (like freehanding in the eyes within the glasses) give the model a huge amount of additional character and brings it much closer to the standards we expect these days. I will certainly be painting more of these as I've wanted some super heroes for a while (always fun for skirmish gaming!). If you have 'Clix figures and you want them ClixFix'ed too then click on the link below to check out the prices and services available:


Until next time...

TTFN

Thursday 7 July 2011

Kick the tyres and light the fires

The air support is here! My Landspeeders are finished:


These are configured for heavy fire support, designed to deep strike in behind enemy vehicles and blow them away before providing fast moving support for the rest of the army. At a hundred points each a lot of people tell me that they are too expensive but consider what they put out. 4 missiles a turn creating either 4 anti-tank hits or 4 blast markers, add this to two multimelta shots and you have a great deal of firepower. Compare this to a Devastator Squad. If you want two multimeltas you will only have two missiles and for this you will pay 150 points. They also cannot move and fire, I would say that 50 points is a small price to pay to have all that firepower drop out of the sky and zoom around blowing stuff up.


Painting wise, the colour scheme is the same as my normal Blood Angels vehicles. Something that will cause raised eyebrows among Blood Angels purists is the decision to paint the crews as devastators. The studio scheme has them in the yellow of Assault marines. This has never made sense to me, this unit does not take or hold ground, does not engage in assaulting. The only vaguely assault related thing is that it moves fast. To my mind this vehicle provides fire support, regardless of its speed. Thus, Devastators. Oh, and I had already painted twenty third company assault marines but only five devastators.


Markings were added with a mixture of freehand and transfers, I tried to get an aircraft feel to the markings by adding small warning labels such as you see on fighter planes. The weathering also needed thought, rather than chips and dings I went with scratches as though from flying object damage. Dust and grime were added in streaks as though from flying through explosions and smoke. The streaks were added by dragging a sponge dampened with Graveyard Earth across the paintwork.


The missile launchers also received weathering. They are magazine loaded so they repeatedly fire, the burns from the missile exhausts have left scars on the paintwork level with the missiles.


I wanted to do something extra with the bases. The clear plastic flying base is just fine but I wanted to do something a little extra with these. The scenic parts on the bases are old, old resin componants that I just can't remember the manufacturer.


I had a lot of fun with the burned out shipping contained, layer upon layer of brown, grey and black stippling went in to creating the burned effect. The peeling paintwork was accomplished by simply rubbing a paper towel over the almost dry Tausept Ochre that I had applied over Jeffrust. Both bases were drilled and fitted with a steel pin made from nails that I dremmelled down (nails, a very cheap source of hardened steel wire for heavy pinning). The lengthy pins secure the Landspeeders nicely while allowing me to remove them if I want them to be up a building of flying over a forest or whatever.

With these finished it brings Project Blood Angels to requiring just 2 sanginary priests and 3 half painted drop pods to be finished. I also have a Death Company dreadnought assembled from left over parts of the Furioso that isn't technically part of the list but is being added for variety (and because there was a dreadnought shaped space in the figure case. No really...)

TTFN

Tuesday 5 July 2011

Workbench: Advanced Waterslide Decals

Something a lot of people have commented on over the years is how smoothly my decals seem to go on. Most people have a hell of a time getting them sorted out - especially on shoulder pads and the like. Unfortunately, I am no exception, it is a big job. Waterslide decals are not a "quick" solution, they offer precision that a brush struggles to provide. I have, however learned several tricks and with some reletively cheap products have a solid methodology which I have decided to share with you all:


You need a few things to get the most out of your decals (I use the term decals because it differentiates between what we in the wargames community call waterslide transfers and the dry transfers that a lot of the military modellers use). Tools wise you need: An older brush that you don't care about; A very sharp blade (I use a single edge razor); fine point tweezers; clean water. Then some chemicals: Gloss varnish (I use Citadel 'Ardcoat); Matt Varnish (I use Vallejo); MicroSet and MicroSol (available from modelling shops). Now cut out your decals and make sure everything is ready to go.


Now gloss varnish the entire part that you are working on, you do not want to leave an edge of varnish as this will have the same effect as the carrier film later on. Wait for the varnish to dry (as in go have a cup of tea).


Now put a small puddle of water on the pallete, lower your decal onto the water, you want to float the paper on the waters surface and allow the water to wick up through underneath the decal.


While the decal is soaking (it should only take 20 seconds or so) wet the area to have the decal applied with MicroSet. You can use water but this stuff helps the decal grip to the paint.


Remove the decal paper from the water with tweezers and guide the decal from the paper onto the part with a brush dampened with micro set. Position the decal roughly in place and discard the backing paper.


Manoeuver the decal into position with the damp brush and smooth it down as best you can, make sure the centre is well attached.


Brush more MicroSet over the top to help with decal adhesion.


Draw away excess fluid with a tissue, use the dampened tissue to burnish the decal down.


This is the result that most people get that causes such frustration. Now to cure it, first let the decal dry fully.


Now brush MicroSol generously over the decal and smooth down the edges as it dries. Be very careful at this point as the MicroSol is literally dissolving the carrier film that the decal is printed onto. If you are too rough you will tear or smear the design.


After one coat the decal is already snuggling down.


A second coat leave just the worst folds still showing, we now need to physically correct this as just softening the carrier film will not solve it.


Gently press a sharp blade along the folds to cut the decal film. It must be wickedly sharp (ie new) as you need to cut the film with light pressure on contact. If you have to draw the blade to cut the film you risk tearing the decal or damage the paintwork.


A final coat of MicroSol smooths out the folds and finally gives us a smooth decal. Let this dry completely. Take the opportunity to clear out any build up of MicroSol and MicroSet from the corners to avoid discolouring the paint when we varnish it.


Now to matt varnish the previously glossed area. Use plenty of varnish initially, clean the brush and smooth the varnish out avoiding brush strokes. The picture shows how the process should start not end!


Finished! Varnish all dry and the decal now looks painted on. Hopefully this guide will inspire some of you to give decals a chance on curved surfaces and to help all of you make your decals look painted on regardless of where they are used. Comments and questions are of course welcome as always.

[Even half awake people will have noticed that the models I have used have no legs. This is because they are Land Speeder crewmen left seperate from the vehicle to allow me to paint the cockpit. These are almost finished and will be the subject of my next post]

TTFN!

Friday 1 July 2011

Come with us if you want to live...

Welcome one and all to another Blood Angels update, this time (as the slightly oblique title references) it is the turn of the Terminators:


These are the real badasses of the Space Marines, veterans all and clad in armour that makes normal power armour look a touch wimpy. I have always loved terminators, mainly because of the face:


There is just something about that mask that I adore. Can't pin it down really. Combine that with the existance of Forgeworld's awesome modelled Blood Angel shoulder pads and I couldn't really say no. I went to town on the red on these chaps, even going back and rehighlighting key areas to draw attention to the face. Aside from this the main areas that I had fun with were those shoulder pads, check them out:


The detail is so delicate and crisp, oh and yes, that is the vitruvian man on the cloth. Might have gotten a touch excited.


One of the advantages of using resin for these "aftermarket" parts is there is no undercut problem. The molds are flexible and so allow nice organic details like the scroll above to be cast cleanly.


There are also some nods to classic space marine iconography (I have just noticed that elbow joint, argh, cleanup on aisle three!) with things like that gold marksman's badge hanging from the shoulder. Oh and this fellow needs it too because he is toting:


That! The assault cannon is a charmingly lunatic weapon for the terminators, a super minigun that any normal warrior would fly through a wall if they tried to fire it. Only the bulk of the terminator armour grants this chap the ability to fire such a colossal firearm.


One other really nice thing about those pads is the small amounts of battle damage that just give them a feeling of age and wear. I decided to paint these as though they were old damage and repainted. By contrast:


The powerfists needed to feel recently scarred and battered. These are weapons that are designed to punch through tank armour plating so paint is pretty much on a hiding to nothing. I wanted the fists to look like they had been looked after but the first combat of the battle had torn them up again.

Well that is it for today. Just 2 land speeders, 2 sanguinary priests and three half-painted drop pods stand between me and 4000 points of Blood Angels. Very excited. Until next time:

TTFN