Sunday 24 April 2011

Happy Easter everyone!


A very happy Easter to all our readers!

The slightly disturbing fellow above is a Scibor Miniatures model from their frankly weird collection of Dwarf and Goblin dioramas. I recieved it as a leaving present from a very pleasant chap called Sam and hadn't gotten around to painting it. Then, with Easter approaching I felt it was only appropriate to celebrate with a really odd model!


The yellow was the test bed for the new method that I have been talking about lately (Iyanden Darksun and Golden Yellow as a basecoat, Gryphonne Sepia as a shade, Iyanden/Golden plus increasing levels of white as a highlight, glaze with Yellow Ink).


Rather than paint the goblin as if he was hiding in a chocolate egg I thought I would have him somehow in a real egg. Hard to tell but there are stringy ropes of yellowish PVA with a gloss varnish coat to represent the gooey contents of his hiding place. Anyhow, hope everyone is relaxing where ever you may reside.

TTFN

Friday 22 April 2011

The Talons of Baal (BFG)

From the stars they come... The Angels of Death, the Space Marines, but how do they get there? Answer:


Having painted a lot of Blood Angels lately, I felt they deserved a way of making planetfall. The ship above is a Space Marine Strike Cruiser from the Battlefleet Gothic range. I am a huge fan of Battlefleet Gothic (or BFG for short) as it combines naval combat tactics with kilometers long spaceships. What's not to like? My Imperial fleet is looking a bit tired these days and so the siren call of the Astartes beckoned once more! The paint scheme for this vessel (the Talons of Baal for anyone interested) is essentially the same red as my Blood Angels but with a Devlan Mud wash in place of the usual red and black shading layer. This gave it a grimier look than the infantry armour.


I picked out the inner spine of the ship in black to give it some variety then picked out all the metal areas in a mix of Boltgun Metal and Chaos Black. Large observation portholes and some little details were picked out in Dwarf Bronze - again to provide variety to the scheme. I then painted any obviously dome-like or big window-like areas Fenris Grey and gloss varnished them. Finally with a mix of Iyanden Darksun and Skull White I picked out some points of light as if there were lit windows within the ship to give it a sense of scale.


To give the engines some life I ran thinned Skull White into the dimples on the back of the engine tubes. Once dry I washed several layers of Hawk Turquoise over the white and surrounding engines and hull. To finish off the model I added a nebula to the base - easy to do, stipple Blood Red directly over the black, then stipple another layer leaving a dark patch on the edges (think fried egg). Then do the same with a 50:50 mix of Blood Red and Blazing Orange and finally Blazing Orange. Once that was thoroughly dry I loaded up a stippling brush with thinned skull white and ran my thumbnail over the tip to spray a fine mist of stars over the base. Make sure to mask the ship (I used a bit of sponge) from the mist and don't overdo it. I made sure that there were plenty of stars around the nebula as they are stellar nurseries, where stars are born. Over a particularly big blob (bottom left in the above picture) I painted a thin cross to indicate lens flare. Makes it look better than just having one whacking star.


And so, with a little photoshop jiggery pokery and a picture courtesy of NASA the Talons of Baal sets forth into the void! Haven't decided how many Space Marine vessels I am going to do yet. Given that my army is entirely 3rd company and this vessel can carry them all I may just do some escort craft and add them to my Imperial fleet. Anyhow, back to the workbench for me as the last 15 Death Korps are calling.

TTFN

Thursday 21 April 2011

Workbench: Renovating old miniatures

Mostly my work involves putting paint on to miniatures and that is what I talk most about here. Today though, I intend to tell you how to do the opposite, cleaning old paint off miniatures to allow them to be repainted.


The model in question is a Captain Tycho I bought from Ebay to paint as the Death Company variant (psycho Tycho!) of my company captain. Now the paint job on him is not awful by any means, not up to our standards, but not bad. It is also completely wrong for the Death Company scheme (lotta black). I could just dust the model with black primer and go again but every layer of paint on a model dulls the detail of the sculpting. Instead I resolved to strip the model back to bare metal and start again. As my method for this is pretty much ideal I felt I should share it with everyone. First step is to remove the base:


Easiest way is to clip a line through the base rim at both ends of the slot. With the base effectively in two halves you can waggle the halves to break the glued bond at the tab.


Comes out nice and easily, there will be a line of texture along the top of the tab. This needs to be scraped off:


A sharp blade and a few seconds later we have a model ready to strip:


I also snapped off the backpack at some point in this process as it was one of the aincient RTB-01 designs and I have shiny new Blood Angels ones that I can attach to him. Now it was time for a bath in my paint stripper of choice:


No your eyes do not decieve you. Fairy power spray is the very best miniature paint stripper I have ever found. It removes paint quickly, has no solvents or harmful chemicals to breath in and best of all, has no detrimental effect AT ALL on plastic or resin. Most commercial stripping agents will dissolve plastic as they are designed to dissolve the paint. The power spray seems to work by infiltrating the layers of paint and peeling them back. Amazing stuff. Oh and it is really good at removing burnt on food too...


This shot shows roughly how much power spray to use. I've used an old broken-handled teacup to strip my miniatures but any small vessel will do. Note the time.


After just five minutes an experimental brush with the cheapest toothbrush money can buy (5p) shows the paint lifting easily from the leg of tycho. At this stage give the model a vigourous brushing to remove the worst of the paint:


Then back into the power spray for ten minutes or so and then more targeted scrubbing (I use the Citadel stippling brush as it is perfect for all scrubbing duties, just don't use it for stippling). Use the point of a craft knife (or tootpick or whatever) to lift any stubborn paint from the deepest recesses. This takes about another ten minutes as the paint in the cracks is tenacious! You could just lob it back into the power spray to help the process but I am patient. Eventually you have:


Good as new in under an hour. Given that I got this model for less than half its cost on ebay - largely due to its condition - I'd say an hour of very limited effort in front of the TV is well worth it. Hope this helps some of you folks save a few bob on renovating old armies. Just make sure to give the figure a damn good scrub under running water after you are finished to remove all trace of the power spray residue. 'Till next we meet:

TTFN

Sunday 17 April 2011

Death Korps: the home straight!

Greetings all! Thought I would post the new Death Korps pics since they represent the last of the non-character infantry. Everything from here on in (about 12 models) is what I term "the fun stuff" and is a reward for finishing all the rank and file. So without further ado, here's the new stuff!


These are the two comm-link operators for the command squads, love how much character they have. Note the bronze "C" shield on the shoulder armour indicating their status.


The last of the Heavy Bolter teams, this one wasn't assembled when I painted the others. It is by far my favourite of the teams. Really conveys a sense of soldiering, ie. 90% walking, 10% blind terror! These guys show the 90%.


The missile launchers are both conversions, one from the Cadian sprue and one from the old Steel Legion metal guardsmen. In fact the fellow holding the next round is a Steel Legion guardsman. This created something of a problem. Usually you would paint a unique figure in the army to stand out and draw attention. Trouble is that would just make this chap look out of place. As such I had to choose and place the colours to blend him in to the Death Korps as seamlessly as possible. The face has had the bare minimum of painting so as to not draw attention to the fact that this would be the only model in the army that you can see eyes on!


My previous post featuring the Grenadiers was focussed on the lasgun armed Grenadiers. This time I have completed the special weapons, the heavy flamers and of course, the sergeants! The sergeants are the dangerous looking chaps above. They show how effectively simply changing the position of the arms make identical models take on a very different character.


Nothing much to report on the special weapon Grenadiers. The burning at the end of the flamer nozzles and the meltagun barrels was achieved with sequential drybrushes of Vermin Brown, Scorched Brown and Chaos Black. This gives a nice convincing sooty look. Slightly more involved than these guys were the heavy flamer squads...

Any Ork player's worst nightmare!

These are tricky to assemble to say the least. The connections between the different fuel tanks are made from resin tubes that come cast in straight lines. This means that you have to soften the resin in hot water, bend it to the required shape and then plunge it into cold water to set it in place. My DKK client had already assembled two of them and had clearly thought (as I confess I had) "sod that" and replaced them with thick wire. I gratefully followed suit:


Much easier to pull off and once painted they look like rubber hoses. Just make sure to use thick wire.


The rubber is my usual Charadon Granite with Badab Black wash.

With that I can see the light at the end of the Death Korps tunnel (and it is a heavy flamer). There will be lots of character posts over the next few weeks then it is delivery day! Till then,

TTFN

Wednesday 13 April 2011

Captain Erasmus Tycho

I was going to hold on to these images and have them with the whole army shoot later in the week but I just can't! Ladies and Gentlemen: I present Blood Angels, 3rd Company Captain Erasmus Tycho!

Edit: All kinds of excited, PVP has got on the SCW Honour Roll! Click the banner to go there.

Readers familiar with Blood Angels will notice immediately that I have gone with red over the more common gold. Why? Several reasons, first, I only think that non metallic gold would have worked on that scale. Truth be told I could have had a good crack at it but it just does not suit my painting style. NMM either looks amazing or rubbish so I had a rethink. Second reason is that everyone paints Tycho gold. Why? He isn't Sanguinary Guard or a chapter master. He's "just" a captain. Hence I settled on red to match his command squad. Trouble is, Tycho is the most understated Space Marine hero model out there and I worried that he would just vanish into the command squad. Enter... big rock! This gives him a ton of presence and solves that problem right away.


Painting wise, he is essentially a pimped up version of the basic Blood Angels scheme I usually do but with two extra blending layers in between each stage. I went for a zenithal lighting scheme - meaning an assumption of a single point of light to inform the position of shadows. You can see it quite effectively on the bent right elbow. The yellow is worth talking about because I think I might have finally nailed a rich yellow tone. It is achieved by starting with a base coat of 50:50 Tausept Ochre and Golden Yellow, white is then added for highlights and Gryphonne Sepia is thinly washed over the result for shading. Highlights are reapplied making the whole effect look quite pastel and insipid. Finally I glaze the entire part in Vallejo Yellow Ink which intensifies the colour and is translucent enough to show the shading and highlighting work.


Gods I love my new camera, there is no way I could have gotten that shot a few months ago. I decided to paint Tycho as a young captain, not long after the incident that scarred him mentally and physically. When I inevitably paint a "psycho Tycho" variant in the black Death Company armour I shall make him older. For now just a touch of Fortress Grey in the final highlight on the skin gives him a slightly older and more experianced look than the sergeants under his command.

So there we have it. Two thousand points of fully painted Blood Angels, I'll do a full army shot over the next few days. Time to get on and finish the 32 models that will turn that into a FOUR thousand point army. Yikes. Anyway whole army shot up soon, stay tuned! Till then...

TTFN

Tuesday 12 April 2011

Blood Angels Command Squad

Its getting all sorts of exciting! Just one model left to paint (Tycho) and 2000 points worth of Blood Angels 3rd Company are done! There'll be shots of the man himself and the whole force later in the week. For now, we will focus on his chosen men, the Command Squad of the 3rd Company of the Blood Angels:


For those unfamiliar with a command squad they are the bodyguard, advisors and confidants of the Captain. As such I painted the background of Tycho's heraldry (yellow with a red bend) on to each of the command squad (usually a kneepad). In keeping with Tycho's backstory (his face was mutilated and he is somewhat sensitive about it) none of the members of his command squad will remove their helms in his presence to avoid drawing attention to their flawless angelic faces (it is a side effect of the Blood Angels gene seed).


The fine gentleman pictured above is the Company Champion, he is expected to represent the 3rd Company at contests and against the champions of the enemy. He is expected to be an inspiration so he needed to look flashy. As such, fancy armour (I used the torsos of Sanguinary Guard and the legs of Death Company - the exact opposite of the Death Company I made) with the nifty leg decoration. A halo backpack, a laurel wreath - symbol of champions since the Roman Empire, they used to be what was won at the olympics y'know - and lots and lots of wings. In addition to the enormous axe I added a winged blood drop to the storm shield. I wanted the shield to look well used while his armour was flawless. The chips are the advanced version of my tank weathering. Start with the top highlight colour of the armour, a mix of sponged randomised chips and thin painted scratches. Next I painted a mixture of Chaos Black and Scorched Brown into the centre of each chip and scratch - imagine the yolk of a fried egg. The final stage is a thin scratch of Boltgun Metal into the centre of the darker scratches. Makes a really realistic look.


Next on the list of flashy people in the squad is the Company Standard Bearer. Trusted to bear the standard of the 3rd Company this fellow also needed some attention. Most of the effort of painting went to the flag, experimented a bit more with non-metallic metal and a ton of highlights later and the finished flag is definately a win.


Finally for focus shots is the Sanguinary Noviate. This chap is training to be a Sanguinary Priest, the holy medics of the Blood Angels who transform the radiation polluted wretches of Baal into the mighty, flawless Angels. As part of his training he serves as battlefield medic to a company captain. In this case to Captain Tycho. White is the mark of a Space Marine medic but always makes them stand out from the army as though they are visiting from the White Scars. Instead I decided to paint only the shoulder pad trim and the narthecium arm in white. This means he is bound to the army visually but stands out in the squad as its medic.

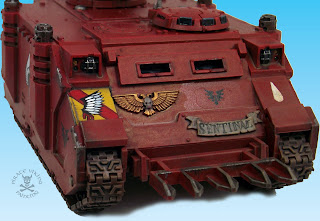
For a sense of completeness I am also reposting the picture of their mighty steed, the Command Squad Razorback Sentinal.


With that, the initial stage of the Blood Angels is all but finished. Their captain already has his armour painted and I find myself looking to the next project... probably Dwarfs. Haven't done a Warhammer army for a while and haven't done a Dwarf army in ten years. Given that most people who know me think of me as either the Pirate, the Viking or... a Dwarf, this lapse has to be rectified. I'll still be finishing the Angels to their final 4000 points (as that is what will fill the two cases I posess for them) and I will be drawing a fat line under that project! More Death Korps by the end of the week for you all.

TTFN

PS: here is the painting plan to fill both cases. For a battle this big I figured changing Tycho into his Death Company aspect and promoting the current captain of the 3rd Company.

Saturday 9 April 2011

Ms Funnymoney and Bases, bases everywhere...

Introducing Pirate Viking Painting's brand new lab assistant:


She started out life as a Reaper Miniatures Professor Laura Pringle but has been demoted a little as her new role and responsibilities don't really merit a Professor rank. What role is this? I hear you cry. She is going to be PVP's scale double. I realised that it is often hard to tell how large a figure is on these pages. You look at a magnified digital photograph and it is impossible to determine the height of the model without context. Now, I could do something really boring and put a ruler in or something but I felt that having an able lab assistant to provide context would look much nicer. To see the difference this makes check out the photos below:


 (Yes that is a work in progress Company Champion, sneak previews!)

Somewhat easier to tell the sizes eh? I had intended to do a set of shots with her against common objects for scale. Sadly however she is a pain in the bum to "cut" from the digital images when shot against my standard white background. Hence I shall mock up a dark background to shoot scale images and throw up a scale page at a later date. For now, we are calling her Ms. Funnymoney as a joke on M's secretary, if anyone comes up with something better then she might be renamed! Something I am very happy with on this figure is her base:


I sculpted this one myself, I roughly filled the base with Squadron Green Putty and crudely smoothed it off, deliberately leaving lumps and bumps. Once it had dried to the crumbly stage I sanded it down to meet the edge of the base. I cut lines into the putty to be the grouting and then sanded down again. I quite like the effect and it was fairly easy to achieve. However, I have found something much, much better...

I got some shiny new things this week. Black Cat Bases intriegued me with their range of metal base inserts for the "Warmachine" style bases. I picked up a few packs as the basing on my Dr Who and Hot Fuzz figures was not to my satisfaction. They are absolutely fantastic, reletively clean cast. Very fast service and intelligent sculpting (lots of "professional" bases just have a lump of "stuff" in the middle, preventing you from attaching your figures in a believable way).


Once painted they have a lovely realistic feel. These are from their urban and victorian street ranges. I intend to do full step by step tutorials on how to get this kind of effect from your bases when I have time. For now, a quick run down: The victorian bases were painted first with Terracotta (an old Citadel paint now available from Vallejo Game Colour). I then picked out individual stones, being careful to avoid any sense of pattern. The colours for these stones were mixed from Terracotta with dabs of other shades added, I don't remember exactly which shades but I know that Khemri Brown; Scorched Brown; Fortress Grey; Cathan Brown and even Dwarf Flesh were among them. I then drybrushed the entire base with a mix of Terracotta and Fortress grey as a unifying highlight. The use of a common base shade and highlight binds the base together. I then washed the base in a mix of Devlan Mud and Badab Black.

The urban bases were base coated in Charadon Granite. Drybrushed highlights of a mix of Charadon Granite and first Codex Grey then Fortress Grey followed. I lined the grouting with thinned Dheneb Stone and then washed the concrete with a couple of very thin layers of Graveyard Earth to dirty it up. The tarmac was a mix of Charadon Granite and Chaos Black, washed in Badab Black. The same thinned Graveyard Earth wash was run over the tarmac and job done!

Adding the models to the bases was a simple matter of snapping off the plastic bases. Snipping off the metal tag and dremel-ing the feet flat to get a decent bond. So let's check out the results!


I felt that the Doctor and his companions would look better on old fashioned urban bases than the grass I had stuck them on before. I really like 'em on the Black Cat inserts. Really finish off the model.


Likewise, the delectable Miss Pond looks a good deal better on a victorian street and as for K9:


Those tiny wheels will be much happier on brick than grass. Finally, lets check out what the Hot Fuzz boys look like.


Much, much better. Really liking the finished effects. You will definately be seeing more of Black Cat's work on these pages. As for the future: with the sneak preview above you might be getting the impression that a Blood Angels command squad is in the offing as well as more Death Korps. Till then...

TTFN

Monday 4 April 2011

Armour of Baal!

After piles and piles of infantry I felt I had earned a tank or three in my free time, so the last of the Blood Angels armoured vehicles was my weekend project. And here they are!


A Baal Predator and a brace of Razorbacks belonging to Tycho's Command Squad and the Sternguard Veterans. As it is the flashiest we'll have a look at the Baal Predator first:


The Baal is a great looking tank, just different enough from the normal Rhino. The heavier glacis plate (the sloped armour at the front) makes it look like it deserves the increase in armour value rather than just a Rhino with guns. Colour wise there wasn't a lot of choice! With all the tanks I have covered the painting before in more detail so I shall mostly look at details and decoration on these fellas. One thing I am very happy with is the honour scrolls on the front. The lettering was a test drive for a new one of those lovely Raphael brushes, this one was an 000 (I've got a 00000 but that will not get broken out very often!). With the added fine control I was able to put a lot more "twiddly bits" - technical term that - in the lettering and make it look a little more up market. One thing to be very careful of, as the size of brush gets smaller the reservoir of paint gets smaller and hence the drying time is reduced considerably. Get into the habit of regularly washing the brush mid job.


The transfer on the side is from the Baneblade sheet, something about the "archer" seemed to work with the assault cannon armed Baal Predator. Plus with the winged blood drops on the sponsons it seemed overkill to add more Angels iconography. The weathering on the flamer nozzles was an experiment for me, sequential washes of Gryphonne Sepia, Devlan Mud and Badab Black getting smaller and smaller area with each darker shade. I might still go back and stipple on some black to give a sootier feel. Not sure. If you look at the cannons you can also see carbon staining from the ejection valves. This was to represent the buildup of burnt cordite gases (or whatever the Imperium use) leaving the thousands of shell casings spraying from the weapon. One slightly odd thing on this model is that the Testors Dullcote has left a slightly textured surface that showed up in the drybrushed dirt. Might have to leave off the Dullcote and tolerate the weird looking gloss varnish patches around the transfers until finished.


Then the Sternguard's Razorback got some love. While finishing the Razorback I noticed that the icon was very, very similar to the 2nd Tactical squad. The difference between a skull on a black background and a skull on a navy blue background is quite subtle. I decided that they needed a more obvious marker that an elite unit was in transit. From the same Baneblade sheet, a wreathed skull was forthcoming. It looked Marine-ey enough and had the subtle "elite" look that that I was after.


By contrast I wanted the Command Squad's Rhino to have no doubt as to the quality of the troops within. I decided to freehand Captain Tycho's personal heraldry onto the squad panel of the Razorback - came out quite well I think! An oddity that you will see in these shots is that while the Dullcote is killing the gloss to the naked eye it is less effective vs. a camera lens. Might have to experiment with lighting.


While I was putting away the Baneblade transfer sheet I noticed one more design, a winged claw holding a sword. Aha! Thought I, if I trim that down I can have another chunk of Tycho heraldry on the door. A few freehand blood drops and the job was done.


So all of the Blood Angels armour is finished! There it is in all its glory in the shot above. There are still three drop pods to paint for the 3k army but they don't really count as tanks. Speaking of which I am now scarily close to finishing the 2000 point list and almost there with the 3000. I've added the paint lists below to show just how close. Anyway, back to Death Korps for me, pics to follow.

TTFN

PS: These have been incredibly theraputic. I urge you to try it for the next project. You can actually see progress.