Wednesday, 26 June 2013

Tooltime: Airbrushes, my thoughts

Airbrushes seem to be an increasing part of our hobby, especially amongst the so-called "elite" painter fraternity with a whole pile of tutorials online for them. I've owned my airbrush for about a year now, so I felt it was time to share my thoughts on this shiny toy and maybe help people who are making their minds up on owning one.


First things first, mine is the cheapest model (Neo for Iwata, sort of a legal knock-off really!) that can still be called a "proper" airbrush. That is with a double action trigger that controls both the flow of air and the flow of paint rather than a single action spraygun. A few immediate considerations:

Not cheap. My one with it's starter compressor (this deal) was £129. That is cheap for airbrushes. If you want a high end one? £300 or more just for the brush. Plus the compressor included is not good, you really want one with a tank as there is a slight pulse to the air flow without one. Expect to add about another ton to the cost to upgrade to a decent compressor. Then consider that it doesn't end there, you need thinners, isopropyl alcohol (isoprop) for cleaning... the list goes on.

Practice. Lots of the tutorials online make it seem like you can just pick the thing up and immediately get spectacular results. This is nonsense. You need to practice with one of these for a time equivalent to using a manual brush to get the same results if you are trying to paint a whole model with one. I just use it for what I call "airbrush specific" techniques. Mostly batch basecoating, weathering techniques and masked camouflage or vehicle heraldry. I wouldn't consider painting whole models with mine because...

Style. There is a particular style that the airbrush creates (if you use it to paint a whole model that is). It is a very smooth, cartoony look. Very popular, just not with me. If - like me - you appreciate the grimy, dark, realistic look (and as you read Pirate Viking Painting I kinda assume you do) then you'll only be using it for airbrush specific jobs only. Consider if you want to spend the money, especially as you can replicate most of the effects with a brush, it's just a little easier with the airbrush.

Cleaning. Urg, this is a real consideration. You have to be fastidious about cleaning these things. They suit a neat mindset, I don't have a naturally neat mind, its why I have a disciplined mind instead. It does mean that the airbrush can be a chore at times. Let me introduce you to post painting procedure:

the back end has been unscrewed to expose the workings

While you are working, paint goes in part 1, you use the trigger (2) to control the air by pressing down and the paint by pulling back the trigger. This pulls the long needle (3) back and opens the tip (4) - by the way, remove this protective cap before painting, all it does is fill with paint and drip. Just put it back on when finished to protect the needle. The air hose screws in at (5) and the whole thing is held together with a screwthreaded part containing a spring (6). Between colours you need to squirt some isoprop into the cup, rub around the innards with an old brush and empty into a spare container, do this twice and then run clean isoprop through the brush until the stream is clean. Seriously, this is what you do between every colour change. Then at the end of the session (and sometimes in the middle if you do a high volume or change to a light colour) you have to strip it down and clean thoroughly or the damn thing gums shut.

note that the protective nozzle cap is gone now
First you unscrew the knurled knob at the end of the brush and extract the needle. Pull it back smoothly and straight, because if you bend it? You are done and it's about £7 to replace. Clean the needle using a kitchen towel and some isoprop. Don't remove the knob (1) entirely, I'll explain why later. Now you unscrew the mechanism from the barrel of the brush (2), if you have removed part (1) then the spring within will try to ping the mechanism apart and scatter expensive componants around the room to the sound of copious swearing. The trigger will just fall out now.


Clean out all the bits you can see with a few cotton buds (Q-tips if you are from over the pond) and more isoprop. Now we remove the nozzle, this is the part that I sheared off when retightening. That spanner is ONLY there to allow you to grip the thing, don't go any further than finger tight, it cannae take it Captain.


Now you can use a thin pipe cleaner (or in this case a rather overpriced set of "airbrush cleaning" bottle brushes of which only the thinnest of the set went through, hmm) to clean the tubes, run it a few times and rinse as it comes out of the nozzle.

Finally, reassemble the whole thing and give it a polish with a last bit of isoprop, after all that effort it is a shame if it doesn't look clean on the outside as well as the inside. This is a messy process, have copious kitchen towels and a beaker or something for excess alcohol. The whole process takes about a quarter hour. If this sounds like an unbearable drag then for the love of all that is holy do not buy an airbrush.

Mess & health: They are messy things, they create an aerosol of paint that falls as dust, also, you have to be intensely careful to mask everything as you won't believe how far this mist of paint can travel. If you don't have an extraction hood - and I don't - then you need to be masked too. A dust mask is a minimum but given some of the chemicals you will be spraying a filtering respirator is better. I forgot myself one time, used the thing for about an hour unmasked with liberal isoprop as thinner and cleaner and then got very lightheaded. I had been inhaling clouds of alcohol, see? Be ready for it and look after yourselves.

Paint: this is a choice thing. You can buy ready mixed paint perfectly suited to the airbrush but results are rather mixed.


The first pre-mixed I tried was Minitaire from Badger. Sadly, this has very, very mixed results, some are great, some - like the metallics - are bloody awful. Seriously, steer clear of anything shiny in this range. The other problem is the price, there is only one real retailer at the moment in the uk and they just convert the dollar price straight into pounds. Very overpriced. Vallejo Model Air is very good (the metallics are superb), cheaper too. But designed for military modellers, you won't easily find chapter colours for instance, that is more Minitaire's bag. You also tear through them. Airbrushes rip through paint and the thin, premixed stuff doesn't go far. My most recent attempt is using citadel acrylics thinned at a 4:5 ratio with Vallejo Airbrush thinner. The mixing bottle in the picture holds an entire thinned pot of citadel acrylics (in this case kantor blue) and thus guarantees a colour match when touching up. I think this will be my preferred method in future except metallics which Model Air will supply.

Conclusions

With all that I have said you might think that I don't think that you should own one. This isn't the case, for what it does well - those airbrush specific jobs - it is worth having. Not worth paying over the odds for (my cheapy one and teeny compressor is doing just fine) though. If you intend to get good with the thing and paint everything with one then shell out for the best you can afford at the very start. Seriously. Other people can recomend better than I if you want to become expert with this. I'll be sticking with the jobs I do with it. I've got 23:1 ratio of years experience with a manual brush vs airbrush. I'm too impatient to get the airbrush up to the same level! What I hope I have done is shown what is involved in owning and operating one of these tools. There are plenty of inspirational tutorials showing how cool they are. I just felt that you should be aware of the chores as well. Forewarned is forearmed as they say!

TTFN

Tuesday, 18 June 2013

Limited Edition Death Korps Quartermaster

Avast shipmates! Remember these? They were part of my last Death Korps commission, two years ago. How time flies. Today, I've added to it:


Yup, this fine fellow is the fantastic Forgeworld event only Quartermaster. He, along with about thirty miscellaneous buddies are being added to the client's original commission. Take a moment and see how far I've come with both painting and photography in those two years by checking out the older post. One of the problems though is that none of the colours I used to paint the previous incarnation exist anymore! Fortunately, by judicious use of online comparison tables I got everything close. A few things just got swopped straight out. I used to mix a particular shade of canvas green (the mask and the puttees around his legs) which turned out to be Val Grey Green. Who knew?


It's actually made me more confident that I could match older paint schemes if I had to with the new paints. Still haven't achieved the same tone for my Blood Angels as I used to but they were a hench army to begin with. Don't think I really need to add much more in the way of infantry to that...

So with this fellow finished some of you who read "Today I have mostly been" either through the Tumblr or the Facebook/Twitter feeds will realise that I solved my brush quandry. I feel I ought to give a qualified shout out to Lawrence Arts who were the only people online in Britain who seemed to have a stock of the Raphael 8404 brushes that I prefer. Seriously, they're brushes. They take up no space whatsoever. How can people run out of them and not be able to restock for a fortnight in the 21st century? Sheesh. Anyway, Lawrence Arts are more expensive than my usual supplier and had a high P&P but by the gods they deliver fast. 17 hours from order to door. Not too shabby. Sadly, I now have to switch from the "Just In Time" supply chain for this sort of thing and move to having a backup of all my brushes so that when they wear out I'm not crippled by supply issues. This might seem a "duh" option but frankly, when brushes last 8 months to a year and take up no space at all you kinda expect them to be available to buy! Paint, yes, I have backups of that, spray too, but brushes. Grr. Never mind, expense over with... or so I thought.


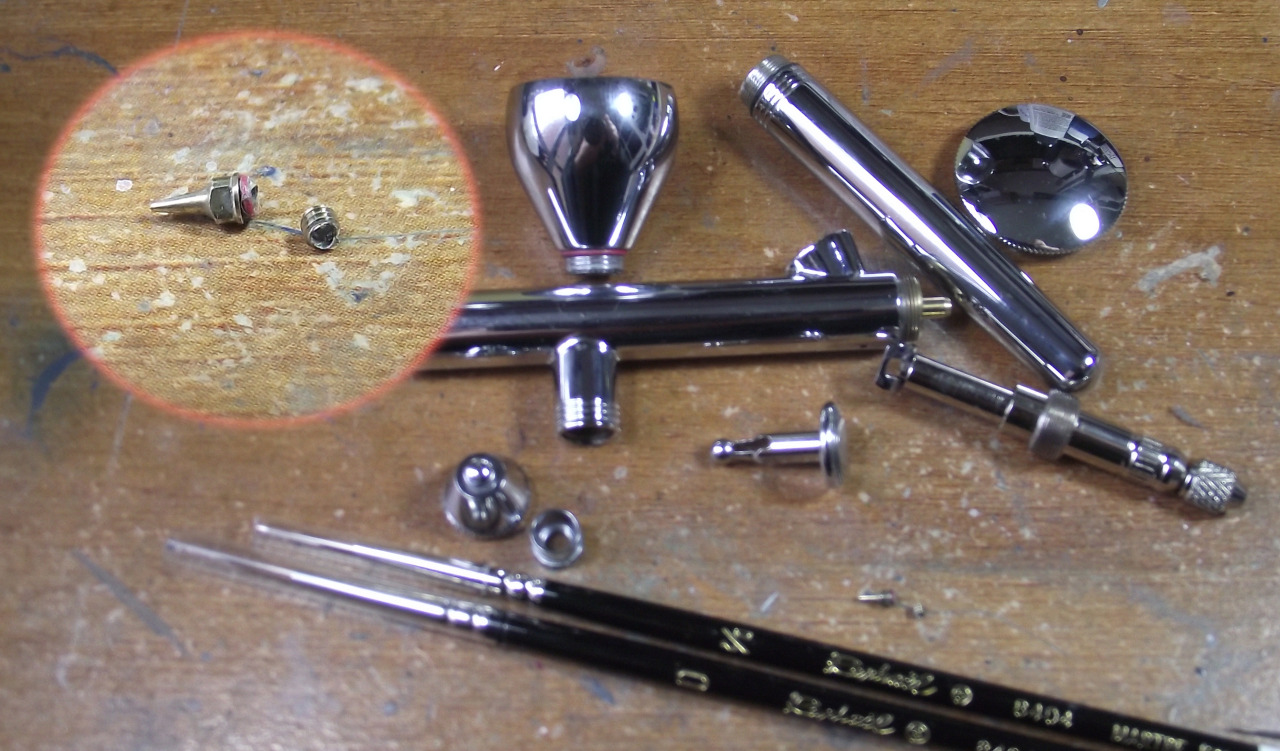
Proving that these things come in threes (my 0 and 00 brushes simultaneously dying and the stockists being rubbish being the first two) take a look at the picture above. The sequin sized componant just above the brushes and magnified in the inset is the beautifully machined, precision nozzle for my airbrush. Without it it will not work. This morning while I was checking for any dirt/paint ahead of continuing work on the Titan it sheared clean off it's screw thread. I managed to extract the screw thread from the brush thank the gods but this now needs replacing too. A quick order on The Airbrush Company's web page found the part (0.35mm nozzle with O-ring if anyone cares) which comes to... Fifteen pounds. FIFTEEN QUID? It's the size of a grain of rice! (thinking about it that's probably why it's expensive Jeff, chill out).

Anyway, I've had quite a day so it was very nice to be able to have those brushes turn up right as I was in mid fury at having all productivity stopped by circumstance. A run around the block and a few cups of tea later I was calm enough to paint again and the DKK Quartermaster was a fun and rewarding model to spend the afternoon on. Aaaaand relax. So, looks like mostly DKK for the rest of the week until the new nozzle arrives. Ce la vie right?

TTFN.


Friday, 14 June 2013

Workbench: Warhound 3!

Hi folks, its been a little quiet here lately which usually means that I've started something large and time consuming and this week is no exception...


Yup, I'm painting another warhound! The client saw Pyladii Alpha and Beta and wanted one of his very own. Its going to be another from the Legio Astorum too (Triarii Sinister) so I've had some practice! This week has been all about cleaning and fitting the sub assemblies and painting the interior of the torso. If you are doing one of these then seriously. Leave about two days for assembly. The legs alone take almost a day.


With the interior, I'd learned from experiance and left the torso section in fore and aft halves. Made it much easier to get the brush in. Still not easy but easier. The Val Grey-Green gives a nice "institutional paint" colour and feels like the sort of colour you paint things that aren't meant to be seen by the public. The dirt and oil around the floor give it some character and age.


The engine section is simarily cramped. You'll notice a variable quality in the painting, some it fairly clear, some just give an impressionist feel. Why? Because once the two halves are together and the connecting wall in place visability is really, really reduced.


One thing that I've adored about this model is in the roof, the grilled opening to exposed engine parts:


It's really hard to photograph well but enlarge the picture and take a look. The grill is an etched steel part that covers the resin componants beneath. It's an awesome effect and if you ever get a chance to see one of these in the flesh then check it out. Really nice.

Thats it for today, started painting the legs, more to follow!

TTFN

Tuesday, 4 June 2013

Arachnaroknophobia

Greetings from a wonderfully sunny Cardiff! Just to increase the envy for anyone who has poor weather right now, my office is right next to the back door and so have basically been outside all day. Ahhhh, after the long cold spring this is a whole hell of a lot better. Only problem is that the warm weather does rather bring the bugs out...

Aaaargh! Kill it with fire!!!
And one hell of a bug it is too. This is the Arachnarok spider from the Orc & Goblin range. It. Is. Huge. Crazy big. For scale, here is a goblin in front of it.


I wanted one of these bad boys in the army from the moment they were released. They are such a lovely addition to the forest goblin range as it makes them more than just a fast cavalry choice. Those who are familiar with the model will know that it has a howdah full of forest goblins currently missing from the carapace. This is being painted separately and attached by magnets so that I can have an Arachnarok unbound as a wandering monster for scenarios. Plus, it is a pain in the behind to store with it attached! I was happy with it though so I thought I'd present first the spider itself and then the crew and howdah later. Lets talk painting. First step was research, as I have a truce with web spinning spiders (I know where they are, they don't leap out on you like the hunting spiders do) so I started with a picture of the British garden spider:


One of my philosophies when painting big monsterous stuff is that it is way, way scarier to have a really big normal creature rather than some weird red or purple thing. Hence, research. This is also the species I based the Spider Riders on. Obviously, the scheme is way to complex to perfectly replicate in painting but it gives you a place to start.


I decided to use Vallejo colours for the carapace of the Arachnarok as they have a more desaturated character. Here's the first tip, have a look at the carapace. While it is patterned, the colours hang together despite being very different. This is because all of the shades start from the same one: Val Tan Earth. That made a solid basecoat, then, by adding Val German Camo Black-Brown I apply the mid tone brown. Adding more Val GC Black-Brown I add the darker areas. The darkest areas on the tips of the limbs and the spines have black added. The paler areas are Val Deck Tan mixed with Val Tan Earth. The result is an impression that the carapace is one colour just in different shades.

I think I should apologise to arachnaphobes (rather than the arachna-uncertain like me) right about now.
For the underside and for the gaps between the limp plates I decided to go for maximum creepiness (and match the smaller spiders) and paint it pale and fleshy. Urgh. But hey, it is a monster and should look like one right?


I felt that the base - being huge, and largely uncovered by the model - needed a little work. The large plastic roots are part of the model and hold the pose of the spider. I added a trunk to give the impression of a long since fallen tree. Patches of rocks helped the parched, flinty look that I started with the other gobbos bases. Adding to that a few shrubs with clump foliage (soaked in dilute PVA to strengthen it) and painting the spiders as miniature versions of the spider rider mounts. Once it was all finished it gave a nice feeling of poor soil, maybe a reclaimed quarry (I should know, I was in one at the weekend).

And that's it for today. I'll obviously show you the crew and the howdah when it is finished. I've got a game coming up where the gobbos have their first ever outing. Should be entertaining. Once I've got the Arachnarok finished and the standard bearer it'll be roughly 1500 points. Good for a first outing.

[Edit: They kicked all kinds of Empire ass! Huzzah!]

TTFN

Tuesday, 28 May 2013

Ursakar Creed conversion and friends

Hi folks, remember this? Yup, that was November. It's one of the things that happen when you do long term projects with multiple elements for clients. You might do some conversion work to give yourself a break from painting that isn't on the schedule until late next season. It's a weird life. Anyway! Getting distracted aren't I? Here are some pretty models:


These three are the last members of Project Flektarn - Now formally named the Caterva Lupus ("Wolf Brigade") of the planet Saran. I won't go into details of the conversions - the first link is to the modelling page for these two - and will instead concentrate on the painting.


The colour scheme is exactly the same as the other flecktarn garbed troopers, I just added more layers of highlighting to everything. It helps to maintain the feel of the army while simultaneously getting the command staff to stand out as the higher quality painting draws the eye. I was really having trouble with deciding on the colour of the coat. Might seem daft to agonise over something like this but it is vital to maintaining the colour balance of the army. Within the army's colour pallete (the shades already used), aside from the insanely complex Flektarn, were blue-grey, beige, dark brown and green, with a pure grey as an occasional spot colour. With the armour being the blue-grey I was initially thinking of using pure grey as the coat fabric. This, I shed as an idea when I started mentally balancing the scheme, too much grey, especially as the bases are also grey. I started thinking about the darker brown but it would have looked like leather - as the other dark brown elements are gloves and boots. Then I realised that the webbing colour would make a perfect military tan brown with the right highlighting. Especially as I had figured that green would be the lining colour. Adding the grey wings to the cuffs help to bind him to the army colours from behind.


No such problems for the Jerren Kell conversion. He is just a trooper in design - albeit with extra armour plates - so once again it was just trooper-plus for the colour scheme. Where it gets exciting is that flag. The tough Wolf Brigade have a sort of runic, almost tribal feel to the personality as described to me and the client wanted the Grey Hunter wolf standard at their heart to help ram that home. I'm so glad he did want it as the finished effect is brilliant and so, so different to the base model that the conversion is based on!

One of the things I enjoy most is painting animals. I love trying to replicate the exact colours and patterns that a cover a creature rather than just going for "grey innit". As always quick research gave me the pattern and then I started playing with the colours. In the end the colours used were Karak Stone, Stormvermin Dinge and a darkened shade of the same by adding black. I can't give you exact proportions or methods as I just play with mixes until I hit the right ones. For sure, the base colour is Karak Stone with Stormvermin Dinge washed over it. The last stage was a very delicate drybrush with some Terminatus Stone to bring out the texture.


When painting designs on leather and hides it is important to remember to add some of the flesh colour you are using into the colours. This is because when you paint on to leather it will eventually crack and allow the colour to show through. Even staining the leather still leaves the colour of the original material present to an extent. Layering pure bright colours straight on there will look false. Instead by softening the colours with the flesh tone (and using it to highlight the colours) will give it a more realistic feel. The colours - blue grey, red, black and white - bind to the pennants painted last time. I deliberately reduced the impact of the shattered chaos star. I wanted the wolf to be the focus. I debated using an angular runic font for the script, but figured that a commissioning standard would be presented in Imperial Gothic rather than the local text of the homeworld, Saran is the world, Lupus the name of the unit.


Finally we have a blast from the past. This chap is from all the way back to the birth of Warhammer 40,000. He's got modern arms but the body and head are nearly thirty years old. For a tough looking regiment like the Wolf Brigade a tough looking commissar seemed to fit the bill. As a result I decided to go with the same Flecktarn camouflage as the troopers but with black armour. Combine that with the lack of gas mask and he'll stand out among the crowds. Some of the details have suffered a little from the age of the sculpt. The aquilae especially are not good, strangely the cap one now looks like a winged capital 'I' rather than the normal double-headed duck. Maybe some Inquisitorial service there Commissar?

So there we have it, the Flecktarn project is about 130 transfers away from completion. That's a job for tomorrow... and maybe Thursday depending on how long it takes!

TTFN

Monday, 27 May 2013

Review: Perry Miniatures Desert Rats

Greetings shipmates! I've got something just a little bit different today. A first look at the plastic 28mm scale Desert Rats from Perry Miniatures.


First impressions then: Like all Perry boxes it comes in a nice, well presented format, nifty pictures and the like and interestingly... unsealed. You can open the box and check out the sprues before you part with any cash. This is welcome feature as there is only the one actual model on the front, I say welcome feature but also a double edged sword. Check the box contents before you buy lest some unscrupulous type chose to bolster the numbers in another box. Value for money? The Rats retail at about £20 but there are thirty eight of them in the box. Yup, 38 28mm models for your £20. That's 52p a model. Not shabby compared to - plucking a random example out of the GW new releases - a dire avenger box set for £20 that has... five models. Yeah... £4 plays 52p. Obviously then the models aren't as good right? Wrong.


Firstly, these are horrible photos. I am sorry for that. Hope you can still see enough detail. By the time I had noticed the astonishing albedo of the white surface beneath I had already cut off half a platoon's worth from the sprues and couldn't reshoot! The models are cast by Renedra - who are some of the people who used to do GW casting by the way. Citadel had their casting operation in Wisbech (my home town). So having a Wisbech miniature casting firm still going is a source of nostalgic glee. You'll notice a similarity to the way the Lord of the Rings plastics were designed - not surprising as they were also Perrys! - with the models being primarily one piece castings with only the gun arms and helmets being separate. This is very common amongst historical miniatures where for some reason it is considered essential to have plastics with the absolute minimum of parts. Probably to do with speed of assembly for the huge armies some games need.

Another nostalgic point was the plastic, somehow, seeing tan brown plastic soldiers transported me back to playing with the pound shop army men of my youth and later the airfix kits that went with them. Couldn't matter less to the quality but a pleasing frisson nonetheless. There are three identical sprues of regular infantrymen and a command sprue making up the numbers with enough weaponry to perfectly replicate the armament of a full platoon of the period (a mix of Lee Enfields, Thompson sub machine guns, the peerless Bren guns, a light mortar and even a Boys anti-tank rifle). It was this "platoon-in-a-box" feature that drew me to buy them in the first place, this along with the soon-to-be released Perry Afrika Corps platoon-in-a-box would give me a perfect wargaming microcosm. A platoon engaging their opposite numbers. But I digress.


The command sprue contains the officer and a signalman complete with radio set. You get a few options on the officer so not all your "Ruperts" look exactly the same. Given the pose though I'd probably replace with a metal alternative for subsequent platoons if I was building a company. Note the seperate leg on the signalman for ease of casting. I'll be coming back to that later. Before we get into impressions of assembling these lads I do want to mention one really bizzare decision in the packaging. The bases that come with these are almost all 20mm round bases from Renedra. Essentially thick plasticard that you glue the integral cast bases on the models to. However, for the lying down models they have included larger 40mm bases... that are square. Just weird as a decision because Renedra make round 40mm bases that would be perfect and wouldn't jar with the smaller ones. Confusing. Possibly a mispack?


Assembly is a mixed bag. The models have virtually no flash and minimal mould lines. The mould lines also (with one exception) go across the head from ear to ear rather than across the face. As I've mentioned, they are almost one piece figures so removal and clean-up is a breeze. Take care of the smaller componants though. These are true-scaled 28mm miniatures so the weapons are thin and delicate. The helmets in particular - kept separate in a cunning move to allow realistic undercuts - are easy to damage at the rim. Remove further along the sprue and then use a new scalpel to shave it smooth. The poses are nice and varied with decent unexaggerated movement. Something to note is how well the centre of mass is positioned. Some companies *cough*mantic*cough* are quite bad at this, creating models that look like they are falling over because the centre of mass is beyond one of the legs. No such problems here.

There are a couple of problems created by the one-piece casting, but only a couple. One of the lads has some very baggy shorts and the bren gun loader's right arm is quite badly distorted by the position it was cast in. Considering that they removed the Signalman's leg to make for a nicer cast surely we could have handled the arm being removed so that it too could be well cast? Some of the models also need pouches adding for the ammo (again not cast in place due to undercut problems). These are very, very small and fiddly. Use tweezers.


I also assembled the command section to show you the other varients of the lying down soldiers. The Boys rifle fits just the same as the bren gun, the mortar is simple enough as well. Both of these weapons do require the modelling of the teams lying down. It does mean that only one of the bren gunners in the platoon (there are three) can be modelled lying down and firing. The others need to be modelled moving (there is a spare arm with a bren gun held at the trail). The fit of the parts are all very precise, I had almost no problems getting things to fit, there was only one pair of arms that was a little awkward. Had the feel of being designed for a specific torso and I think I'd used it already. This brings me to my only major bugbear with this kit and it is one that I keep running in to. No decent documentation.

There are no real instructions for this kit, just a mention of which arms are paired for the heavy weapons. Granted, there is a handy diagram of the armament of a platoon but almost no assembly help. Considering how much effort was made in every other aspect this is a bizzare oversight. Seriously? Too hard just to assemble a couple of sprues and take some pictures? There are guys out there who will be happy to do loads of photos of assembled models, even step by step guides for no more payment than some free sprues. Heck, I'm one of 'em.

Having said that, this is a superb set. The ease of assembly, the quality of the sculpting from industry veterans for a mere 52p a model, the nice range of poses and armaments and best of all the platoon-in-a-box aspect all make this a real winner. I'll let you know how they paint but I can really recommend them to anyone interested in gaming some 28mm WW2.

Hope this helps some people!

*EDIT* Something I completely forgot. If you want to represent the Long Range Desert Group (forerunners of the SAS) they've included the conversion parts in the form of arab headdressed/soft hatted bearded heads. You can chop off the regular heads and add these. Just add a Pink Panther Land Rover or two and you are set.

Best of all, you only need 37 men for a platoon. 1 Officer, 6 command staff, 3 platoons of 10. The spare 1 man can therefore be put together as a free SAS chap! So if you are doing a company then you can fairly easily have an LRDG patrol without buying anything else.

TTFN

Saturday, 25 May 2013

Bumper Flecktarn update and... Its our birthday!

Greetings one and all! Well, my goodness me. This time of the year rocked around quickly! It is our 3rd birthday, hooray!


After the chaos that surrounded our second birthday (it was right in the middle of the two house moves in 2012) it is gratifying to get to our third birthday at all! Thankfully, here we are and here indeed are all of you: An unbelievable 34,207 of you have from 108 countries generated a scary 79,000 pageviews. Yikes. Seriously, I'm just some bloke in Cardiff painting models. It is humbling to have that kind of attention. Thanks to all of you. Actually, something that has changed since last year is the almost 30,000 fake hits from spammers (blogger reckons that there have been over 100k hits, I have better data!), there is a weird growth in spam sites visiting blogs to generate sudden spurts in traffic, as a result the blogs owner visits the referring site and thus is exposed to whatever they want. Usually Canadian pharmacies for some reason. As a result it is becoming harder for us bloggers to track our audiences.

This may seem vain but in fact it is to do with giving you guys the content you like best. I can see which pages get the most hits and re-visits and give you all more of that kind of content. Helps us to improve our writing and presentation. Its tricky to know what to do about this, Blogger - I suspect - are aware and trying to find a work around. For now, what I would recommend is that as many of you as possible actually follow blogs that you like (hopefully including this one!) as it will give us a much stronger audience impression and ensure you never miss anything cool! I follow an absolute heap of blogs and have found more cool stuff in the last three years of wargaming than I had in the previous twenty three! So go ahead and follow all those cool blogs out there and get more content, rather like this:


The Flecktarn project is coming to a close. Just three models remain, a commissar, an Ursakar Creed and a Jerren Kell pair of conversions. I also need to spend a day applying the transfers and markings to the army. This first photo is of the platoon standard bearers. The client wanted the red, black and white classic Imperial colours to fit in with the Imperial agents I did last year. I wasn't sure about the bare arm on the chap on the right at first but somehow it makes him seem that bit more badass. Adds to that "uniform but ragtag" feel that the rest of the army has. Almost like a private army, a mercenary force that has equipped itself.


And then a host of boomsticks. I love grenade launchers and missile launchers. The tactical flexibility of the choice of anti-infantry or anti-armour warheads makes them my favoured armament for Imperial Guard. If you need to punch a hole through something bigger then you have stacks of tanks and anti-tank squads. Keep the squads for dealing with the variety of light armour and infantry that the enemy can throw at you. The green warhead on the missile matches the green painted cylinder grenades that several of the lads have on their backpacks.


Earning the bravery awards for the army, the three plasma gunners have arguably the most dangerous job in the Imperial Guard. When every sixth pull of the trigger can kill you, you've got to imagine that the operators are either constantly nervous or insanely full of bravado. The two on the outside flanks were both conversions to fit metal space marine plasma guns to regular plastic imperial guard arms. I kept the stocks of the lasguns in situ to give a nice "rifle" look which I like for the plasma weapons.


The heavy flamer came out really nicely. Thanks in no small part to the AK Interactive enamel weathering paints I've been playing with lately. The grimy, rusted nozzle and the oily, leaking pipes are all achieved in seconds with the enamels. They aren't for everyone and are far, far more toxic than anything you'd find in an acrylic but they have some real advantages, mostly for feathering and streaks. I promise a tutorial is coming. I think I've got it sussed now!


Like the rest of the army, the comm-links are an eclectic bunch, further reinforcing that rag-tag PMC look.


The sergeants give a nice view of the resin torsos used on some of the guardsmen.


And finally the officers. The only markings they will have are the cuffed sleeves and the wermacht style commissioning plaques around their necks. Love the guy with the swagger stick.

And thats all for today folks. Obviously there is a little bit of work still to go on the markings and on the last three figures and of course, there will be pictures whent they're finished!

TTFN