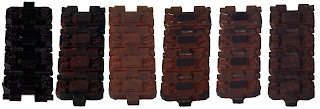
Method 1: "Bitzrust" (the simplest)
Bitzrust is the most straightforward of the methods. It creates a slightly unsatisfying rust but a fairly nice "heavy" metal feel. Bitzrust's method is as follows:
- Basecoat with Tin Bitz over a black primer.
- Drybrush with 50:50 mix of Tin Bitz and Boltgun Metal.
- Drybrush with Boltgun Metal.
- Wash with Badab Black.
Method 2: "Charlierust"
Charlierust was created by Charlie Brassley of The Beard Bunker as a simpler version of my Jeffrust. Works as a nice quick rusting scheme with a much more satisfying feel than Bitzrust. It lacks the deep variation of tones that Jeffrust has but also doesn't take four stippling steps to achieve...
- Basecoat with Calthan Brown over a black primer.
- Drybrush with Boltgun Metal. Use a stippling motion on flat areas to create texture.
- Wash with Badab Black.
Method 3: "Jeffrust"
This one is my baby (no Jeff, really? Jeffrust is yours? No kidding?) I developed it ages ago when I was painting Orks and Ogres. Lots of rust on them, I wasn't happy with the GW method that was around at the time and developed this in response. The method is as follows:
- Basecoat with Dark Flesh over a black primer. You may need two coats of Dark Flesh to achieve a solid coat of colour.
- Stipple on a layer of Vermin Brown. Use a partially dried brush to ensure that the Dark Flesh coat is visible beneath the Vermin Brown. I recommend using an old drybrush for this, don't use the so-called stippling brush. It has its uses but stippling isn't one of them...
- Repeat the stippling with Macharius Solar Orange (I used to use Blazing Orange before foundation paints existed). The MSO gives a lovely dusty feel to the orangey rust. Ensure that you use a drier brush than the previous step. You want to leave Vermin Brown and Dark Flesh visible under this layer.
- Drybrush Boltgun metal onto the rust with a stippling motion. This creates the sort of scrapes and dings that expose the bare metal through the rust. This step determines how rusted your finished piece looks. A light coat creates an ramshackle corroded look. A heavier coat creates a lightly corroded appearance.
- Wash the rust with Badab Black to define the shading.
Method 4: "Powders" (the most complex)
I can't really pretend to be an expert here as I have just started using these. This is the preferred method of most of the 1/35 modellers out there. All of the powders mentioned are Forgeworld:
- Over a black primer or a coat of Vallejo Track Primer dust a heavy coating of Aged Rust. Brush off the excess.
- Dust another coat of Light Rust over the top of the Aged rust. Brush off and blend the excess.
- Dust a final coat of Orange Rust over the Light rust to add depth to the effect.
- Using a pencil, define the edges and highpoints of the rust.
- Finally dust the entire piece with a light coat of Light Earth to dirty the piece up.
There isn't a "best" method in this quartet. Only different ones that I use for different purposes. To find your favourite play with these and pick one! Alternatively invent your own and share the results with the world! That's all for now folks.
TTFN.


For the "powders" method you can fix it in place with the "fixer" product available from MIG and AK Interactive. I wish I know for sure what this stuff was so I could find an alternative but once applied that powder isn't going anywhere.
ReplyDeleteCool set of tutorials.. very interesting to see them.. only one I don't see is the one from Cool Mini or Not painting book.. which is very close to Jeffrust, but with Chestnut ink thinned and washed over it.
ReplyDeleteThanks for taking the time to post this. I think I'll be using the 'Charlierust' method when I eventually get round to my Guard Tank company.
ReplyDeleteIf you want to fix your rust powder you have to use some kind of purity seal (GW fixer) or other hairspray.
ReplyDeleteThx for your tutorial, it helps me to do my Malcador!