Wednesday, 9 October 2013

Corsair Banshees

Hi folks, just a quickee today to show off some more of the Void Dragon Corsairs, this time: Howling Banshees.

wraithbone weapons very tricky to cut from the background so no pretty blue fade, sorry!

As with the warlocks, I was conscious that these needed to be corsair banshees, not craftwold banshees. As a result I decided to abandon the traditional bone that these girls normally come dressed in and use the grey and red that we've been using throughout the project. There was also some kind of weapon arm mishap somewhere between the client's bits boxes and my workbench so the banshees have had new arms scavenged from storm guardian sprues so that makes them a little different again.


There's not a lot more to say about them. The wraithbone method was covered in the warlock post and the grey is just a straight series of highlights from Mechanicus Standard Grey up to Administratum Grey via a shading wash of Nuln Oil and a layer of Dawnstone. Dire Avengers next!

TTFN

Sunday, 6 October 2013

The Anvil of Doom... and our 300th post!

Greetings one and all! When I posted the previous blog entry it suddenly occurred to me that a milestone, long impending, had actually arrived. The next post would be my 300th. Woohoo! And as for a subject... kinda had to be Dwarfs:


Yup, I decided it was time to give Dwalin Gravenrune an Anvil of Doom. He hasn't earned it yet - in the Beard Bunker narrative campaign - but it's there when he needs it! For those who don't know, the Anvils of Doom are Dwarven artifacts, magical foci that allow Runelords to craft their mightiest runic creations. But that isn't all, they can also allow the Runelord to crystallise raw magic out of the air, beat it into complex runic forms and then unleash the effects upon the enemy. With this artifact, even Dwarfs can cast magic.


Of course, I didn't want to bind the Dwalin model to the anvil permanently, so I sacrificed some aesthetics to leave him on his base. This'll help with some of the skirmish scenarios we do too as it'll allow me to move him from his post.


From above you can see that the anvil is stood upon three discs of stone, stepping up to form a dais. I envisioned these as being individual stone tiles, layed out in particular patterns - Stargate style - to focus and draw in the magical winds to best advantage. I used my usual system of varying the base colour slightly in between tiles/planks/whatever to give a hint of natural variance in colour. Use the same highlight colour for all of them and it binds the whole piece together regardless. The anvil itself was a source of much head scratching. I couldn't decide initially whether I wanted it blingtastic - totally a word - covered in gold, enamel, jewels... That could have worked, but I kept coming back to the core of what this thing is. It is a tool. It is a mechanism that allows a Runesmith to craft magical devices and bend the laws of reality. Somehow, it looks better painted an unassuming iron. To me anyway!


I'd managed to lose the shields for the guardians but there is a perfect design on one of the warrior shields. So donation here we go! Not a lot to say about these lads. Unusually for me they have painted woodwork on the hafts of their hammers but that was to get a little more of the army colour scheme on the models. Now, I just have to uncover enough of Karak Hoch (the imaginary, long abandoned hold that we are retaking at the heart of Hochland) to discover the Hearth and Hoard. There... an anvil awaits!

Mulder always fights in the shade. With his skin tone, you kinda have to!
So whoa, 300 posts of random ramblings about painting models. I am often struck by the weirdness of this situation. I've never once felt like a "pro-painter" or "expert" in my life. I'm not a Golden Demon winner, I've just painted models for a few decades. That so many people come here, to read my ramblings, look at pretty pictures of my work and join the conversation in the comments is genuinely humbling. I've learned a huge amount from these interactions and look forward to many many more. You are all people, clearly, of impeccible taste and quality, handsome too I'd wager.

Thanks folks, here's to the next hundred.

TTFN

Wednesday, 2 October 2013

Corsair Warlocks

Hi folks, today we present the lowest rung of the psychic might of the Eldar Corsairs, a pair of pirate Warlocks:


These pair served as the test models for the farseers still to come. I needed to find a way to make the grey and red corsair scheme work on the more obviously craftworld models. Initially I had the grey of the robes roughly the same as the armour colour but this just looked dreadful. For some reason it just homogenised into one grey mass that looked for all the world like unpainted plastic. Darkening the robes and putting a very light edge highlight on the armour differentiated the areas and actually turned them into painted models, phew!


Balancing the red across the models was mostly achieved with the gemstones, rather than just use the turquoise from the vehicles I used some red ones too. That allowed the colour to be spread subtly across the model rather than in a stripe at head height. The Void Dragon scheme has red hands and faceplate you see, so with both hands up the red would just have been in a horizontal strip. I initially thought to paint the entire singing spear in wraithbone but this seemed to be a bit too much. Talking of wraithbone...


The step by step above runs left to right, first a couple of coats of Ceramite White establishes the basecoat for the bone areas. Note the difference between the first and second images. It is worth making the effort to put the second coat on. Every layer after this is very weak colour and will not cover properly without this solid basecoat. Next we use two layers of Secret Weapon Miniatures' Parchment wash. I picked this up along with both his blacks as I was on my constant quest to find Badab Black again. Sad to say, Secret Weapon aren't it. They stain too much. But, this very property makes it perfect for the wraithbone and I dare say for Deathwing too. Once they've dried off Seraphim Sepia defines the shadoes. Normally I just run the wash into the recesses of the weaponry but this time I had a mishap and so the whole thing got coated. It's fine, just needs more layers of highlight is all. The final image shows the models after a couple of highlights of white mixed with the SWM Parchment are applied. This crisps up the colour and makes for a nice artificial bone look.


While on the subject of weaponry, the warlock's are a good example of an older model - 20 years or so - which has stood the test of time beautifully save for one element. The blades. Old school sculpting and casting led to a requirement for blades of weapons to be more like clubs with a 1-2mm thick edge. This warlock still looks awesome thanks to the genius of one Jes Goodwin but the blade does age it terribly. Easy enough to fix though. This is one of the occasions where a metal file is not the tool for the job. Use a flexible emery board (bit of sandpaper on card) with a medium grain and sand it down moving from the centre to the edge. Essentially you sharpen the blade as if it were real. Keep checking the edges to make sure you are getting a consistant thickness - especially these complex curving edges of the eldar swords. Keep checking the central spine of the blade too as otherwise you can end up making it look bendy. The transformation from left to right took about ten minutes. Well worth it to update this classic model.


Once painted you can see how nice and crisp the esges of the sword look now. Before I go I should mention gemstones, I'm trying a new method for these and it seems to be working. Paint the basecoat and then glaze it with black ink. This creates the dark areas really nicely and then you just work up the highlights as normal. Seems to be doing the job! Anyway, with the experimentation over it is onwards and upwards with these lads. Until next time.

TTFN.

Tuesday, 24 September 2013

Mandrake Masquerade

Hi folks, something a little left field for you today:


These are three of Freebooter miniature's Brotherhood characters (Bonaccia; Apagado & Trucco). They are being used as Mandrakes - Dark Eldar shadow creatures who live for assassination and murder - in my client's Corsair Eldar army. The challenge for me was to paint these in a way that said "Mandrake" and helped them fit in with the existing Void Dragon's colour scheme. Turned out a greater challenge was making the camera resolve the very subtle differences between the black tones on the models!


While we're talking black, Each area of the model's clothing and leather is a different colour, doesn't look that way in these shots, they're much better in person! I used the principles I discussed way back in Paint a Ninja and used a different starting colour for each basecoat. Washing them down with successive layers of Nuln Oil and then rehighlighting with the base colour. This created the very dark, shadowy feel that I felt the Mandrakes needed. The weapons - to make them feel a bit more Eldar-y - were painted the same wraithbone as the weapons on the corsair tanks. In the same vein...


The masks were painted with the red-bronze mix that I'd used before. Indeed, these are the best pictures for showing the metallic character of the red. I was really worried that they would be too bright, too gaudy for the characters of the Mandrakes but the splash of red really made them.

This one just hated being photographed, imaging artifacts, poor contast differentiation. Grrr.
Where skin was visible, I painted it as black - as the Mandrakes are described in the Dark Eldar Codex - by mixing Cadian Flesh with black and adding more Cadian Flesh for the highlights. A thin glaze of Reikland Fleshtone gives a tiny breath of life to it. The eyes and carved sigils on the mandrakes are supposed to blaze with light and power so I went for very, very bright green for the eyes. Hopefully this has captured some Mandrake-y character to these Brotherhood models. I kinda pictured them as Mandrakes who had tagged along with Harlequins and picked up some of their theatricality and style.

I have to say a word about the models. They are stunning sculpts. Absolutely fantastic. To the extent that I want to get some of my own and paint them in a more "typical" rennaisance-ish fashion. Might have to see about some sort of Tiliean project some time... Until next time folks.

TTFN.

Saturday, 21 September 2013

Druids and Tendons and Bears, oh my!

Hi de hi campers, I've actually got new models to show you, gasp!


So, for those who don't follow my trials and tribulations on either facebook, twitter or the Today I've Mostly Been tumblr that feeds the other two... I've been having problems this week. About two years ago I developed an RSI in the tendons in the back of my wrist. Turns out painting for 8-12 hours a day was a bad idea. The burning pain convinced me to take some time off, cut back on my hours with brush in hand and all was well. Until a fortnight ago when it came back. Well, this time, there was no way on earth I was letting it get to the debilitating pain stage. Off to the doctor's I pop. I now have spanky anti-inflammatories (not your daddy's ibuprofen I can tell you) and referrals to the physio who'll hopefully be able to blitz the tendons with ultrasound and free them up. Until then, though, I still have to be able to work. So the rest of this week has been tentative experiments to see how smoothly and how long I can operate. The results are the dynamic duo above!

These two are the start of the next phase of Project RPG, this is an attempt by me to have a model to represent every class from the Pathfinder RPG. There's a fair few of them and I've divvied them into a few different adventuring bands. The Druid and his grizzly bear animal companion are the start of the third team.


The Druid is the old (possibly antique) Citadel Truthsayer from the Albion campaign. I didn't change a darned thing about him as the design was pretty much perfect. I decided to use a darker, more tanned skin recipie for this chap as the outdoors life plus clothes aversion would suggest it! I have to once again put a big shout out to GW's flesh tones. They got a few things wrong with the new range but whoa, the flesh is brilliant. Bugman's Glow was shaded with Reikland Fleshtone, then hightlights were built up from Bugman's through Cadian Fleshtone and into Kislev Flesh for the highest highlights. Some of the blending is a little clumsier than normal (and oh dear god did he take longer to do than normal, I'd generally say 5-6 hours for something like this, this week? Closer to 10. Sheesh) but I like the overall effect.


I kept most of the rest fairly simple, I wanted him to look primitive, not covered in bling. So bronze jewelry, simple linen cloth (karak stone) and undyed leather. The bear teeth around his neck bind him to his companion visually. As is normal for me, once I've figured something out it tends to turn up a lot so the little terracotta pot at his belt uses the same Val Saddle Brown and Deck Tan mixes that I used on the goblin doom diver crewman. The glass bottle was Incubi Darkness, glazed with black ink and rehighlighted with Incubi Darkness. The liquid inside was one of the reds mixed with Incubi Darkness to tint the colour of the liquid with the colour of the bottle. A couple of catchlights (lines rather than dots) and a gloss varnish finish it off. God's knows what's in it, Druid Fluid probably (badum tish).


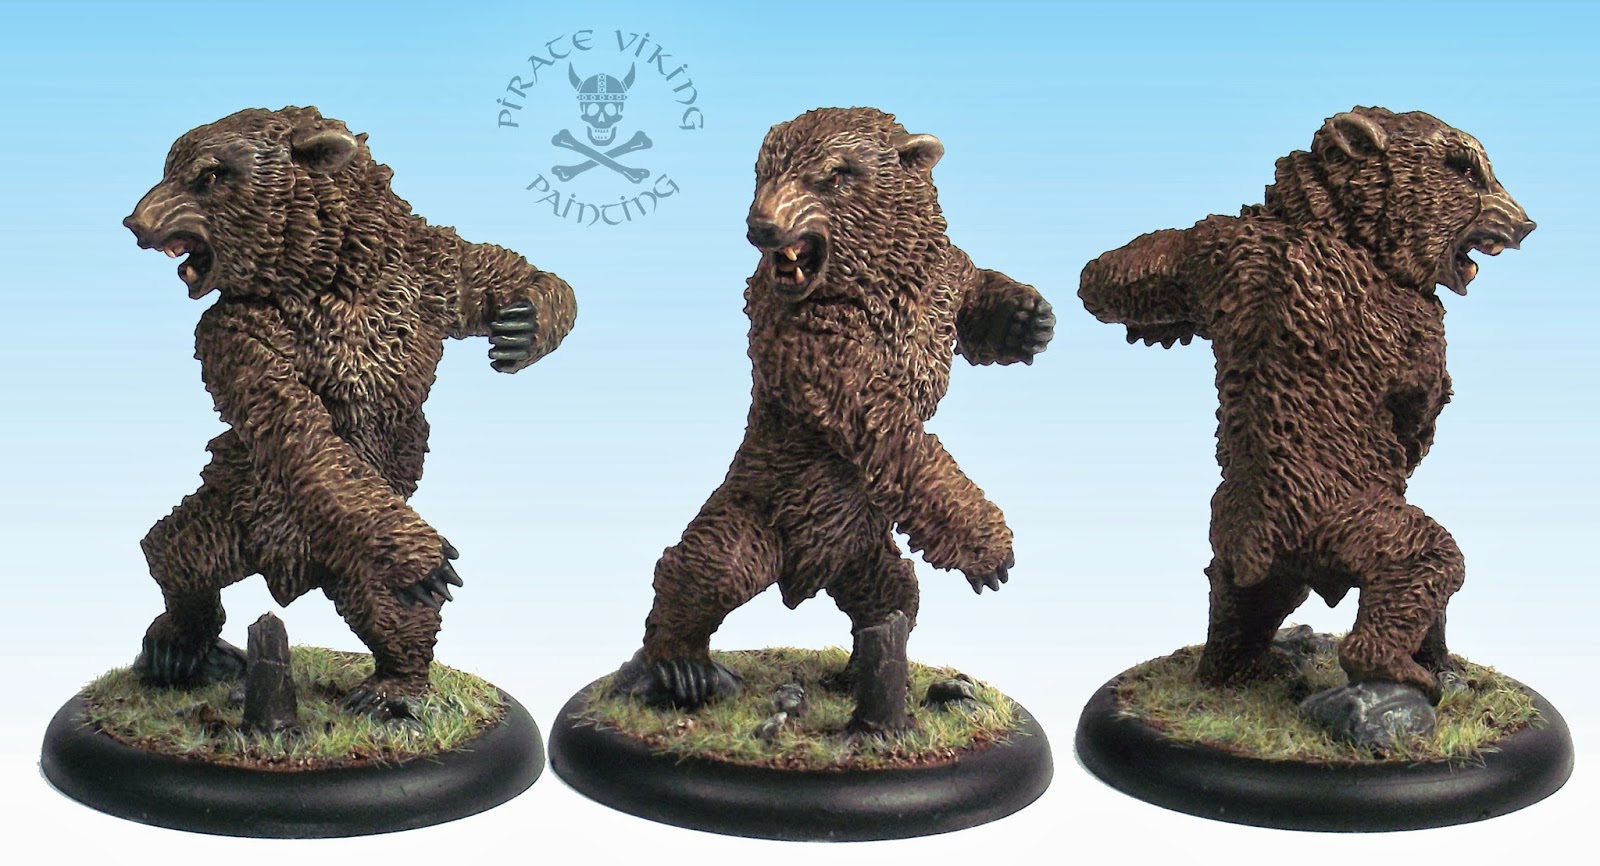
His leetle friend is a Reaper Dire Bear. Love this sculpt, and it's actually a proper size for a normal grizzly, never mind a dire bear! Something I realised with this model is that I just love painting animals. I love getting the subtle changes in tone (that the camera then ignores) between different areas of fur, getting the eyes right, everything. It ties in to my preference for painting monstrous creatures as the huge versions of the real thing (way scarier). This chap was fairly simple, I used the Vallejo browns as they are a little less saturated and by mixing different shades (I can't tell you, I just don't know, I keep the paint wet and just change the tone by adding different colours so the whole model feels like one continuous colour that just changes shade) achieve the ruddier back, lighter chest and belly and facial markings that characterise a grizzly.


Visual reference is essential when painting animals. You've seen hundreds of examples over your life and will subconsciously know when something is "wrong" even if you couldn't say what it was. For instance, in this case, the black patches on the mouth and gums (wash Nuln Oil over Bugman's Glow), the orangey bone teeth, the black nose, the dark eyesockets, the hazel eyes. All things very characteristic to Grizzly's and help to make the model work.

So, that's that! The test models are pretty and are just about there quality wise (the flesh on the druid is the best place to see where the stiffness in my wrist causes the problems) to allow me to get back to work Monday. I'll be ditching the eldar vehicles for now (the hexes are a problem) and do some of the infantry to give my wrist time to heal. Shorter bursts but progress can now be made. Huzzah!

TTFN

Tuesday, 17 September 2013

Goblin Clown Cannon!

Greetings one and all! Today I shall share with you one of the most bonkers models I've ever created. My version of a Doom Diver, the Bitter Moon Clown Cannon:


This was actually painted at while ago but there's a bit of a gap in the regular output (sodding wrist is acting up again) so I thought I would fill it with nutcase goblins! I originally posted the work in progress shots up at the Beard Bunker so I won't go over the details of it's creation, instead, we'll talk painting!


I mused for ages about whether to paint the woodwork and barrel to be the sort of bright colours that a clown cannon would be. In the end I decided against it because this would fit better into my fairly "realistic" toned Night Gobbos. The splash of cartoony-ness would come from the concept and the sculpts. Not the paint scheme. The woodwork therefore got the usual treatment of Val Beige Brown with Val Deck Tan stripes and an Agrax Earthshade wash to create a nice woodgrain that the camera has utterly failed to capture, heh. Indeed, all the metalwork was also shaded with Agrax and this bound the piece together and allowed the eye to focus on the goblin. This is despite their being lots of little details for the eye to roam over. There's the barrel of "Boom Stuff", an unwisely located fireplace cooking some nameless stew and the initial spark of flame and puff of smoke as the touch hole catches ready to propel El Gobbo into the sky.


Speaking of El Gobbo's, it is worth noting that the old school doom diver models I am using are old enough to be seriously out of scale with the new lads (there's actually three eras of goblin in this model). Weirdly, this seemed to work. The big dumb bruisers can both wrestle their way to the front of the queue to have the one way ride of a lifetime and are dumb enough to actually get in the darned cannon in the first place. The others will shrug and pretend to be wearily resigned to only getting to fire the enormous gun and launch bully boys into the sky...


Speaking of launched. Given that the job of a doom diver catapult/mortar is to create not-so-smart bombs you have a marker model in the form of the flying gobbo to show where the impact is. Oddly this is in the rules now that it is the base of the flying stand that the gobbo is on that is the marker, not a standard blast template, if they change the flying stand do we get a bigger boom? Weird. I had something of a rush of blood to the head while painting it and realised that this model would only be used to indicate which people were hit. The cartooniness of the whole composition reared its head and moments later...


This way every time I fire it I get a cartoon speech bubble of the poor victim screaming "Incoming!" followed by the inevitable Kapow! Silly? Hells yes, but, y'know, goblin!

For those wondering where the Eldar have gotten to, unfortunately I've had to step away from the painting table for a while. I got the early warning signs of the RSI I picked up two years ago returning. Rather than do the stubborn thing of pushing through the cramps and tightness - and creating worse paint jobs as a result - I've stopped until the inflammation goes away and freedom of motion is returned. Should only be a few days (edit: this was supposed to go out middle of last week, it is still not right, grr) but I'd rather that than a return to the terrible, burning pain that was the result last time. Gosh, sense, who'd've thunk it huh?

Until next time folks

TTFN

Wednesday, 4 September 2013

The Hornet's Nest

Greetings one and all, a trio of Eldar light vehicles today:


My familiar blue background fade has to go for these unfortunately as it is almost impossible to cut the weapons from the white backdrop! Let me just say, right off the bat, that I love these models. Despite all the trials and tribulations, the design is just peachy. I honestly don't know why they called them Hornets as the shape is so reminiscent of a shrimp. Surely there is another badass shrimp other than the mantis (already used see) they could have been named after, am I right? They're one of those models that you fly around making zoom noises when they're finished. You all know you do it too.


Following the same painting scheme as the Warp Hunters; these three are part of what will be a fair sized Void Dragon Corsair army. I'm starting to get a feel for how to work with Eldar vehicles, they often have asymmetric paint schemes to match the sculpting. The trick is to find only one thing to be different or asymmetric on the models. In this case it is the red hex/scale sections. The weapons, the black and the turquoise gems are the same on each and help the models hang together as a unit and prevent the scheme being too confused. We human types like symmetry and repeat patterns so it's important not to go too nuts with the alien asymmetry.


While we're talking hexes, I thought I'd share how I do it. The first step is to get a really clean, flat basecoat as there is no possibility of fixing this later! Next, start from a vertical line of darker colour to start the shapes. This pretty much defines how large the hexes will be so think it through! I tend to use smaller for smaller models, larger for larger. At the end of the line paint some V-shapes, then connect another one to the first and carry on until completely covered. Once you've got your hexes layed out, run a line of highlight colour all the way around each scale - this, this stage right here, takes some time - giving it the start of a 3D feel. Finally, make a lighter highlight mix (in this case the shade is adding Warplock Bronze to the "metallic red" I mentioned in the Warp Hunters and the highlight is just adding more Hashut Copper) and paint the top two edges and one of the sides. Make sure not to change which side is highlighted! It'll look pleasantly 3D and define the shapes involved.

Well, that's all for now, more Eldar fun soon!

TTFN