Go to Part 1: Rusting a stompa
Following on from the article on rusting I will be talking about a beatifully effective technique for making a scoured paint effect. Basic technique for chipped paint over a Jeff-rust base is pretty simple, just paint the colour centrally leaving a jagged edge exposing the rust beneath:
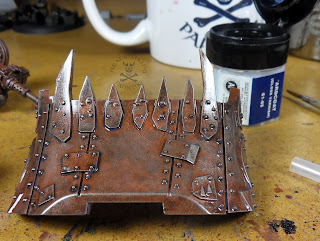
Given that the simple technique is never going to make a full how to I decided to dive into one of the coolest weathering techniques out there and have a go at hairspray chipping. First, paint your model in Jeff-rust as shown in the first part of this article. For this tutorial I am using the dozer blade from the Ork Battlewagon. This is the perfect part to use this technique on, it isn't suitable for doing occasional scrapes and dings, the paint really needs to take abuse for this to look right!
Step two is a gloss varnish, happily this brings out the rich layered colours of the Jeff-rust for photography:
Next, once the varnish has COMPLETELY dried give the part a good coat of hairspray. Cheap stuff is ironically better for this as you are really using it as a water soluble fixative.
Once the hairspray has completely dried (give it about a cup of tea and an email check to dry) begin painting your designs on to the part. Notice that the white teeth have been treated as "simple weathering" with chips left and the rest of the part is painted as factory finish. A note on camo patterns. DO YOUR RESEARCH. Let either the studio or the army do the work for you. They have tried thousands of patterns and know what looks good. You don't need to spend six years figuring that out. Good artists borrow, great artists steal. Use slightly thicker paint than normal as you don't want to wash off the hairspray prematurely.
Once this layer has dried start attacking it with a citadel stippling brush - this really is the best tool for the job. It's no bloody use for stippling but for hairspray weathering it can't be beat! Scrape away at the layers of paint following the lines of where the damage will have occurred. Look at photo reference to get this right. Keep the strokes light but use thousands of them. There were a few places where I over enthusiastically scraped an edge right back to the undercoat. Using a light touch will also have benefits as we will see below. Note that the scratched areas will be gloss, this will look weird. Do not worry. We will be dulling this down next.
The finished effect, incredibly realistic even before I have dust washed and dirtied it. Once you have finished scraping and scratching hit the part with a coat of matt varnish. I use Testor's Dullcote as I haven't found a better spray varnish. Make sure you use thin layers in a warm, low humidity environment or you will ruin your paint work.
When I was talking about light strokes earlier you can see how the hazard lines on the side of the blade have worn away the black leaving the yellow beneath.
If you look at the leading two edges you can see that they are more metallic than the rest of the part. This is because I scoured it back down to the basecoat. Happily this was corrected with boltgun metal that just made it look like the rust had been scraped off too! I would heartily recommend a selective drybrushing of metal onto heavily used areas to replicate this effect as it looks great.
Oddly, while most paint effects look worse on camera than in real life this one looks better! You can see how the paint layers have realistically peeled and given a wonderful three dimensional effect.
Well, hope you all found that useful, questions, suggestions and thoughts in the comments box please!
TTFN


Hairspray, huh? Interesting. This technique looks alot like the version with salt, although you do put a layer of sealent in between them. Is the purpose of the varnish to give the metal beneath a shine?
ReplyDeleteElegant technique with a great result. I've seen similar, but your particular permutation is really nice looking and seems easy to accomplish. Thanks! This is why I like your blog so much.
ReplyDeleteThe varnish is to protect the rust beneath and encourage the hairspray to dissolve. Lots of weathering techniques - including washes - work better over a gloss surface as the paint flows better. You want to avoid the shine so I kill it with Testors dullcote (as I mention in the post). The dullcote also seals in the remaining paint preventing the hairspray from loosening any more. The salt technique you mention is wonderful for getting a worn effect on - say - vehicle numbers where you want selective wear. The hazard line weathing is an example here.
ReplyDeleteMike - thanks a lot, it's great to hear people like the blog. Encourages me to keep it going!
Thanks for clarifying. :)
ReplyDelete